 Nimila
Toshiba e-Studio3525AC how to import address book from LDAP. This comprehensive guide details the process of seamlessly integrating LDAP address books into your Toshiba e-Studio 3525AC printer. Leveraging Lightweight Directory Access Protocol (LDAP), this method offers a streamlined solution for managing contacts within your print environment. The process involves preparing the LDAP directory for export, understanding the printer’s address book structure, and securely importing the data.
We’ll cover potential pitfalls and solutions, ensuring a smooth and secure integration.
The guide breaks down the process into manageable steps, from initial setup to troubleshooting common issues. Clear explanations and illustrative examples ensure a straightforward understanding of each stage. Crucially, the document emphasizes security best practices to protect your data throughout the import process. This thorough guide will equip you with the knowledge to efficiently manage your printer’s address book through LDAP.
Introduction to LDAP Import
So, you’ve got your Toshiba e-Studio 3525AC printer, a workhorse churning out documents like it’s on a mission. But what if you could streamline your address book management, making those print jobs even smoother? Enter LDAP. Think of it as a digital address book, a super-organized directory system, perfect for holding all your contact information. This system allows the printer to access and pull information directly from a central repository, rather than relying on individual entries.LDAP (Lightweight Directory Access Protocol) is a networking protocol that simplifies the process of accessing and managing directory information, like user accounts, contact details, and other data.
It’s like a digital filing cabinet, but far more sophisticated. This makes it perfect for syncing with your company’s central directory system. Imagine the efficiency of having your printer automatically access the most up-to-date contact information, eliminating the need for manual input and reducing errors.
LDAP and Address Book Management
The Toshiba e-Studio 3525AC, a versatile machine, allows for integration with LDAP servers. This means the printer can fetch address book entries from a central LDAP server, streamlining the printing process. This integration significantly improves efficiency and accuracy when handling print jobs that require address details. It’s like having a super-powered address book assistant right at your fingertips.
Import Process Overview
Importing address books into printer systems like the Toshiba e-Studio 3525AC involves pulling data from a designated LDAP server. The printer’s software interacts with the server to retrieve and store the necessary information. The process is often straightforward, requiring configuration of the LDAP server’s settings within the printer’s management console. This ensures that the printer can correctly identify and utilize the relevant contact information.
Import Steps
This table Artikels the general steps involved in importing an address book from an LDAP server. Remember, specific steps may vary based on your particular setup.
| Step | Description | Example |
|---|---|---|
| 1. Configure LDAP Connection | Establish a connection between the printer and the LDAP server. This involves specifying the server’s address, port, and authentication details. | Set the LDAP server’s IP address as ‘192.168.1.100’, the port as ‘389’, and use the ‘admin’ username and ‘password123’ password. |
| 2. Select the Address Book | Choose the specific address book within the LDAP server that you want to import. | Select the ‘Sales Contacts’ address book from the LDAP server’s directory. |
| 3. Initiate Import | Trigger the import process. This often involves a button click or a command within the printer’s management interface. | Click the ‘Import Address Book’ button in the printer’s settings menu. |
| 4. Verify the Import | Check the successful completion of the import. This might involve checking the printer’s address book or sending a test print job. | Verify that the ‘Sales Contacts’ entries are displayed in the printer’s address book. |
Preparing the LDAP Directory
Alright, so you’ve got your LDAP directory all set up, ready to rumble with your address book. But before you can export those contacts, you gotta prep the directory. Think of it like getting your car ready for a long drive – you need to check the oil, make sure the tires are inflated, and double-check the route.
Same principle applies here. Let’s dive into the crucial steps.This section Artikels the vital steps to prepare your LDAP directory for a smooth export process. From configuring the necessary settings to ensuring proper permissions, we’ll cover it all, so you can confidently handle this data transfer. Get ready to make your LDAP directory export-ready!
Exporting Data from the Directory
To export your address book data, you need to configure your LDAP server to provide the necessary information. This involves specifying the attributes you want to export (like name, email, and phone number), and defining the format in which the data will be exported (like CSV or XML). Essentially, you’re telling the LDAP server “Hey, give me this specific information in this specific format.” Crucially, you need to have the correct permissions to access and export the data.
Necessary Configurations and Settings
Proper configuration is key for a successful export. You’ll need to specify the exact fields you want to include in the exported address book. These might include common fields like first name, last name, email address, and phone number. Imagine a spreadsheet—you choose the columns you need to populate. Furthermore, decide on the file format (like CSV, which is common and widely compatible) for the exported data.
- Attribute Selection: Carefully choose the attributes to be included. Avoid unnecessary data, focusing only on what’s required for your address book. Think of it like packing for a trip – you don’t need to bring everything, just the essentials.
- Export Format: Choose the output format (like CSV, XML, or other standardized formats). A common choice is CSV, due to its widespread use and easy readability by various applications.
- Data Filtering: Consider filtering the data to only export specific entries. This is super helpful if you need to export only contacts from a particular department or location. Think of it like using a filter on your email inbox – you only see messages from specific senders.
Permissions and Access Controls
Security is paramount. You need appropriate permissions to access and export the address book data from the LDAP directory. Think of it like having a key to a locked room – you need the right key to open the door and access the contents. Ensure that the user account or application used for the export has the necessary permissions to retrieve the data.
- User Account Permissions: Verify that the user account or application you’re using has the necessary read permissions for the address book data in the LDAP directory.
- LDAP Server Settings: Review the LDAP server’s configuration to ensure the export process is allowed. Think of it like setting up a firewall – you need to ensure the right traffic is allowed through.
- Security Protocols: Employ secure protocols like LDAPS (LDAP over SSL) to protect the sensitive data during the export process. Imagine using a secure envelope to send a letter – it’s much more secure than sending it through regular mail.
Step-by-Step Export Guide
Now, let’s get practical. Here’s a simplified guide to exporting the address book from your LDAP directory:
- Connect to the LDAP Server: Establish a connection to your LDAP server using the appropriate tools or APIs. This is like dialing the phone number to connect to the server.
- Define the Search Criteria: Specify the attributes and conditions to retrieve the desired address book data. Imagine searching for a specific name in a phone book.
- Execute the Export: Initiate the export process using the LDAP tools or APIs, ensuring the output is directed to the desired location (like a file on your computer). This is like pressing the print button on a printer.
- Validate the Export: Verify the exported data to ensure accuracy and completeness. This is like checking if the printed document is correct.
Importing the Address Book into the Printer: Toshiba E-studio3525ac How To Import Address Book From Ldap
Alright, so you’ve got your LDAP directory all set up, ready to rumble. Now, it’s time to bring those contacts into your Toshiba e-Studio 3525AC. Think of it as a digital handshake—the printer needs to know who to talk to. This process isn’t rocket science, but knowing the ropes will save you headaches later.The Toshiba e-Studio 3525AC boasts a user-friendly interface for importing address books.
It’s designed to be intuitive, but a little knowledge goes a long way. This section will walk you through the steps, highlighting potential hiccups and how to fix them.
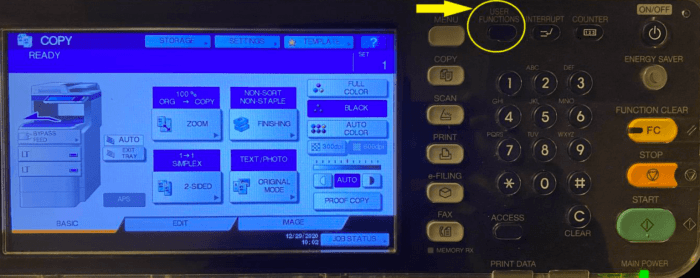
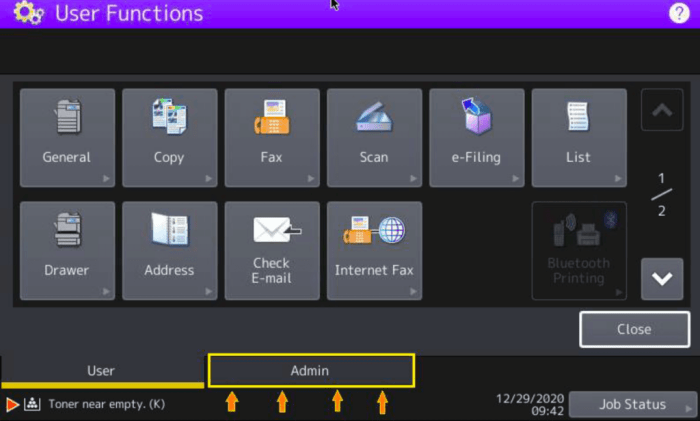
Initiating the Import Process
The import process is generally straightforward. You’ll need to access the printer’s administrative panel, usually through a web browser or a dedicated printer control panel. Look for the “Address Book” or “Contact List” option. From there, select the “Import” function. A dialog box will appear, guiding you through the process.
Choose the LDAP directory you previously configured and authenticate with the appropriate credentials.
Navigating Potential Errors
Importing address books, like any digital endeavor, can sometimes hit a snag. Let’s face the potential roadblocks head-on.
| Possible Error | Cause | Solution |
|---|---|---|
| Import Failed – Invalid Credentials | Incorrect username or password provided during the import process. | Double-check your LDAP credentials. Ensure the username and password match the ones used for authentication in the LDAP server. If you’re still having trouble, consult your LDAP administrator for assistance. |
| Import Failed – Network Connectivity Issues | Problems with the network connection between the printer and the LDAP server. | Verify the network connection. Check for any firewalls or network restrictions that might be blocking communication between the two systems. Restart both the printer and the network devices, if needed. |
| Import Failed – LDAP Server Down | The LDAP server is not reachable or is experiencing technical issues. | Contact your LDAP server administrator to troubleshoot the server issue. If the problem persists, try importing the address book at a later time. |
| Import Failed – Incorrect LDAP Configuration | The printer’s LDAP configuration is incorrect. | Double-check the LDAP server’s address, port number, and authentication settings in the printer’s configuration. If the configuration is wrong, modify it in the printer’s settings, and retry the import process. A misconfiguration might also stem from the LDAP server’s structure. |
| Import Failed – Insufficient Permissions | The printer’s user account lacks the necessary permissions to access the LDAP directory. | Verify that the printer’s user account has read access to the address book in the LDAP directory. If permissions are incorrect, consult your LDAP administrator. |
Remember, patience is key. If you encounter an error, don’t panic! Follow the provided solutions to get your address book import back on track. The printer is just trying to do its job, and a little troubleshooting can make all the difference.
Troubleshooting Common Issues
Ugh, importing an address book into a printer? Sounds like a mission impossible, right? But fear not, intrepid adventurer! We’ve got this. Sometimes, the digital frontier can be a bit rocky, and you might encounter hiccups during your import journey. But don’t worry, we’re here to navigate those bumps in the road and get your address book smoothly synced with your Toshiba E-Studio 3525AC.
Common Import Errors
Navigating the digital labyrinth of LDAP import can sometimes lead to frustrating dead ends. Understanding the potential pitfalls is key to getting your printer’s address book up to speed. Knowing what to look for will make troubleshooting significantly easier. So, let’s dive into some common issues and how to tackle them.
Troubleshooting Table
| Issue | Possible Causes | Solutions |
|---|---|---|
| Import Fails with Error Code 123 | Incorrect LDAP server configuration, network connectivity problems, or insufficient permissions. Imagine trying to access a website with a wrong address; you’ll get an error. Similarly, the printer can’t reach the directory. | Verify the LDAP server’s IP address, port number, and authentication credentials. Check your network connection; a weak signal can really mess things up. Ensure you have the necessary permissions to access the LDAP directory. If you’re still stuck, consult your LDAP administrator. |
| Import Takes an Unreasonably Long Time | Slow network connection, a massive address book, or an overloaded LDAP server. Imagine downloading a huge file over a dial-up connection; it takes forever. The same principle applies here. | Optimize your network connection. Try importing during off-peak hours to reduce server load. If possible, divide the address book into smaller chunks for import. You could also contact your LDAP administrator about the server’s capacity. |
| Imported Data is Inconsistent or Incomplete | Corrupted LDAP directory data, incorrect data mapping, or issues with the printer’s configuration. Imagine copying data from a damaged document; you get a messy result. The same happens here. | Verify the integrity of the LDAP directory. Ensure the data mapping is correctly configured in the printer settings. Review the printer’s configuration for any inconsistencies. Consider contacting technical support for assistance. |
| No Data Imported | Incorrect LDAP server settings, insufficient permissions, or problems with the printer’s configuration. This is like trying to open a locked door with the wrong key. | Double-check all LDAP server settings, including the server address, port, and authentication method. Ensure you have the appropriate access permissions to the LDAP directory. Review the printer’s configuration for any mismatches. Contact support for help if you’re stuck. |
Specific Error Messages
Encountering specific error messages during the import process can provide valuable clues about the underlying issue. Decoding these messages is crucial to effectively resolve problems. For instance, if the error message indicates a network timeout, you’ll know that the printer is having trouble connecting to the server.
Security Considerations
Importing address books from LDAP to a printer, like the Toshiba e-Studio 3525AC, is a sensitive operation. It’s crucial to prioritize security to prevent unauthorized access and data breaches. Think of it like securing a treasure chest – you need a lock and key, and a sturdy vault to keep it safe.
Data Encryption
Data encryption is paramount during the LDAP import process. Encrypting the data in transit and at rest ensures confidentiality. Imagine sending a secret message – encryption is like scrambling the letters so only the intended recipient can understand it.
Use strong encryption algorithms, like AES-256, to protect the data. This prevents unauthorized access if the data is intercepted. The more complex the encryption, the harder it is to crack.
Access Control
Implementing strict access control measures is vital to restrict access to the LDAP directory and the printer itself. Only authorized personnel should be able to initiate the import process. This is like having a security guard at the treasure chest entrance.
Use robust authentication mechanisms like multi-factor authentication to verify the identity of users trying to access the printer’s import features. This adds another layer of security beyond just a username and password.
Secure LDAP Import Best Practices
Follow best practices to minimize security risks during the import process. This involves using secure protocols like LDAPS (LDAP over SSL/TLS). Imagine a secure tunnel connecting the printer to the LDAP server – that’s LDAPS in action.
- Validate the LDAP server’s certificate to ensure it’s legitimate. This step prevents man-in-the-middle attacks, where a malicious actor tries to intercept the communication.
- Regularly update the printer’s firmware and software to patch known security vulnerabilities. This is like upgrading the security system to address any weaknesses that might be discovered.
- Restrict the printer’s access to only the necessary data in the LDAP directory. Don’t import more information than absolutely required.
Security Measures Table
| Security Aspect | Recommendation | Example |
|---|---|---|
| Data Encryption | Use strong encryption algorithms during transmission and storage. | Employ AES-256 encryption for LDAP communication. |
| Access Control | Implement multi-factor authentication and role-based access control. | Require a username, password, and a one-time code for import access. |
| Secure Protocols | Utilize secure LDAP protocols (LDAPS) to encrypt data in transit. | Use LDAPS for all communication between the printer and LDAP server. |
| Vulnerability Management | Regularly update printer firmware and software to patch security holes. | Apply security patches for the Toshiba e-Studio 3525AC as soon as they are released. |
Alternative Methods (if any)
So, you’ve got your LDAP import method down pat, but what if… well, what if LDAP just isn’t your cup of tea? Fear not, intrepid printer owner! There are other ways to get that address book into your Toshiba E-Studio 3525AC. Let’s explore some alternatives and see how they stack up against the LDAP method.
Manual Input
Manually inputting each contact is a viable, albeit tedious, option. Perfect for smaller address books or situations where LDAP isn’t readily available. This method lets you directly enter each name, number, and address into the printer’s system. Imagine a spreadsheet of contacts; this is essentially transferring that data to the printer one cell at a time. This method is straightforward, but it’s not ideal for extensive lists.
CSV Import
A more organized approach is importing from a CSV file. This method is excellent for large address books. CSV (Comma Separated Values) files are easily created and managed in spreadsheet software like Microsoft Excel or Google Sheets. Each contact is represented by a row, with fields for name, number, and address. The printer likely supports importing this format; consult your manual.
It’s significantly faster than manual input, especially for voluminous address books. Think of it as bulk-importing contacts.
Comparison Table
| Method | Pros | Cons |
|---|---|---|
| LDAP Import | Automated, scalable for large directories, centralized management, potentially integrates with existing systems. | Requires LDAP server setup and configuration, potentially complex setup, depends on network connectivity. |
| Manual Input | Simplest method, no external software needed, works offline if required. | Extremely time-consuming for large address books, prone to errors, not scalable. |
| CSV Import | Faster than manual input for large lists, organized data entry, manageable. | Requires creating a CSV file, might not be compatible with all printer models, potential data integrity issues. |
Advantages and Disadvantages
The table above summarizes the key advantages and disadvantages of each method. Choosing the right method depends heavily on the size of your address book and your technical expertise. LDAP is a powerful solution for complex setups, but CSV import and manual input provide viable alternatives for simpler needs. Consider the time investment, technical expertise, and scalability requirements before making a choice.
If you’re just adding a few contacts, manual input might be sufficient. For a large company with an existing LDAP setup, LDAP is the clear winner. For something in between, CSV import might be the sweet spot.
Advanced Configurations (if applicable)
Alright, so you’ve got your LDAP directory dialed in, address book imported, and the printer’s purring like a happy kitten. But sometimes, the default settings just aren’t enough. Enter advanced configurations – the secret sauce for truly customized LDAP integration. These configurations are vital for complex setups, like those involving multiple LDAP servers, specific attribute mappings, or enhanced security protocols.For optimal printer performance and address book accuracy, tweaking these settings is key.
Understanding the options and their implications is crucial for avoiding headaches and ensuring a smooth operation. Let’s dive into the intricate world of advanced LDAP configurations for the Toshiba e-Studio 3525AC.
Custom Attribute Mappings
The Toshiba e-Studio 3525AC, like many printers, doesn’t directly understand every attribute in your LDAP directory. So, you need to tell it which LDAP attributes correspond to the printer’s required fields (like name, department, etc.). This process, called attribute mapping, involves specifying which LDAP attribute maps to the printer’s name, address, department, and more. Accurate mapping is essential for the correct display of contact information.
Incorrect mapping can lead to mislabeled print jobs or missing contact details. For instance, if your LDAP uses “displayName” for the user’s full name, you’ll need to map this LDAP attribute to the printer’s “Name” field. Similarly, “department” in LDAP might map to “Department” in the printer’s configuration.
Multiple LDAP Servers, Toshiba e-studio3525ac how to import address book from ldap
Some organizations use multiple LDAP servers for different departments or purposes. The Toshiba e-Studio 3525AC allows for the configuration of multiple LDAP servers. This is beneficial for scenarios where different parts of an organization use different LDAP directories. You can configure the printer to query multiple servers in a specific order, or you can define specific filters for each server.
A complex example would be a large corporation with separate LDAP servers for different branches. The printer would need to be configured to access each server in sequence or by a filter for branch-specific data.
Advanced Security Protocols
Beyond basic authentication, some LDAP setups use advanced security protocols like LDAPS (LDAP over SSL). The Toshiba e-Studio 3525AC supports such protocols. Configuring LDAPS involves specifying the server’s SSL certificate and port. This enhances security by encrypting the communication between the printer and the LDAP server, protecting sensitive user data. It’s crucial for organizations handling sensitive information.
This is often necessary for adhering to regulatory compliance standards.
LDAP Configuration Impact
| Configuration | Impact | Example Scenario |
|---|---|---|
| Custom Attribute Mappings | Accurate address book display, prevents mislabeling | Correctly mapping “department” from LDAP to the printer’s department field |
| Multiple LDAP Servers | Handles data from multiple branches or divisions | Accessing user data from separate LDAP servers for different business units |
| Advanced Security Protocols (e.g., LDAPS) | Enhances security by encrypting communication | Protecting sensitive user information during address book import |
Sample Address Book Data (if applicable)
So, you’ve got your LDAP address book, all set and ready to go. But how do you make sure it’s compatible with the Toshiba e-Studio 3525AC? It’s all about the format, folks. Think of it like a secret language – the printer needs to understand the words. This section is your Rosetta Stone for getting your contacts in the right format.
Sample CSV Data
To make sure your address book data imports smoothly, it’s crucial to use a well-structured CSV file. This is a standard format that many systems use, making it easy to transfer data between them. Here’s how it works.
CSV File Structure
A typical CSV file contains data organized in rows and columns. Each row represents a contact, and each column represents a field of information about that contact. The first row usually defines the column headers.
- The first row (header row) should contain the names of the fields (e.g., “FirstName”, “LastName”, “Department”, “Email”).
- Each subsequent row (data row) should contain the actual data for each contact, corresponding to the fields in the header row.
- Comma (,) is the separator between fields in a CSV file.
Example CSV File
Here’s a sample CSV file that you can use as a reference.“`FirstName,LastName,Department,Email,PhoneRaditya,Dika,Engineering,[email protected],081234567890Andika,Kurniawan,Marketing,[email protected],081298765432Rizky,Ramadhan,Sales,[email protected],081212345678“`This example demonstrates the standard CSV structure. Notice the comma separating the fields in each row. The header row clearly defines what each column represents. This is crucial for the printer to correctly identify and interpret the data.
Sample Address Book Record
This table shows a sample address book record with various fields. Each field is essential for a complete contact profile.
| Field Name | Data Type | Example Value |
|---|---|---|
| FirstName | Text | Raditya |
| LastName | Text | Dika |
| Department | Text | Engineering |
| Text | [email protected] | |
| Phone | Text | 081234567890 |
Remember to carefully check the specific field requirements of your Toshiba e-Studio 3525AC model. Different models might have different limitations or preferences regarding data formats. Always consult the official documentation for the most accurate and up-to-date information.
Closing Notes
In conclusion, importing address books from LDAP into the Toshiba e-Studio 3525AC printer is achievable with careful planning and adherence to the Artikeld steps. This guide provides a detailed walkthrough, covering everything from setup to troubleshooting. By understanding the process, configuring the LDAP directory, and following the import procedure, you can successfully integrate your contact information into the printer’s address book.
This streamlined approach improves efficiency and enhances your printing workflow. Remember to prioritize security measures throughout the process for optimal data protection.
FAQ Section
What is the recommended CSV file format for importing address book data?
The recommended CSV format should include columns for each field supported by the Toshiba e-Studio 3525AC address book. Refer to the printer’s documentation for the specific field requirements and data types.
What are the common error messages encountered during the import process and their solutions?
Common errors may include incorrect LDAP settings, insufficient permissions, or incompatible data formats. Consult the printer’s documentation for specific error messages and their troubleshooting steps. Verify that the LDAP directory structure matches the printer’s expected format.
What security precautions should be taken when importing address books via LDAP?
Prioritize secure LDAP connections and ensure proper authentication. Use strong passwords, enable encryption, and carefully manage user permissions to limit access to sensitive data. Follow the best practices for LDAP import security Artikeld in the guide.
Are there any alternative methods for importing address books besides LDAP?
While LDAP is the preferred method, alternative methods might exist depending on the printer’s capabilities and the user’s needs. Consult the printer’s documentation for alternative options, comparing their pros and cons to the LDAP approach.
