

How to replace battery ford flex limited 2018 forum provides a comprehensive guide for tackling this automotive task. Understanding the intricate steps involved in replacing a Ford Flex 2018 battery is crucial for ensuring safety and optimal vehicle performance. This guide delves into the process, from crucial safety precautions to troubleshooting common issues, and draws upon insights from the dedicated forum community.
This comprehensive guide walks you through each stage of the battery replacement process, from initial safety checks to final testing. We’ll cover essential tools, detailed procedures, and common pitfalls to help you navigate this task with confidence. The advice and experiences shared by other forum members are incorporated to provide a rich, practical understanding of the process.
Battery Replacement Procedure for the Ford Flex Limited 2018
Replacing the battery in a Ford Flex Limited 2018, like any vehicle, necessitates meticulous attention to detail and safety protocols. Incorrect procedures can lead to damage to the vehicle’s electrical system, personal injury, or failure to restore proper functionality. This comprehensive guide Artikels the steps involved, emphasizing the importance of adhering to the established procedures.Proper battery replacement ensures the vehicle’s electrical systems resume normal operation without complications.
This involves not only the removal and installation of the battery but also addressing any associated connections and potential hazards. Adherence to safety protocols and the use of appropriate tools are crucial for a successful and safe replacement process.
Required Tools and Materials
The battery replacement process necessitates a collection of tools and materials. Failure to have these items on hand can lead to delays or safety risks.
- A new battery that is compatible with the Ford Flex Limited 2018’s specifications. Incorrect battery sizing can lead to issues with amperage, voltage, and charging, impacting the vehicle’s electrical system.
- Appropriate safety equipment, including insulated gloves, eye protection, and a sturdy work surface. These measures prevent electrical shocks and physical injuries during the handling of potentially hazardous components.
- A wrench or socket set appropriate for the battery terminals. The correct size wrench or socket is essential for safely disconnecting and reconnecting the battery terminals without damaging the terminals or causing accidental breakage.
- A battery terminal cleaner and a battery terminal protector. These tools can help to remove corrosion and prevent future corrosion build-up, maintaining the longevity and functionality of the electrical connections.
- A battery hold-down clamp (if needed). This tool ensures the battery is securely held during removal and installation to prevent accidents.
- A multimeter to verify voltage and amperage readings. This tool is vital for ensuring the battery is fully charged and functioning correctly after replacement.
Potential Issues and Troubleshooting
Several common issues can arise during the battery replacement process. Understanding these potential problems can aid in prevention or quick resolution.
- Corrosion on the battery terminals. This issue often necessitates thorough cleaning to ensure proper electrical contact and prevent future issues.
- Incorrect battery type. Using a battery with incompatible amperage or voltage specifications can damage the vehicle’s electrical system.
- Incorrect terminal connections. Improper connections can lead to faulty operation of the electrical system or even damage to the electrical components.
- Insufficient battery capacity. A battery with insufficient capacity may not provide the necessary power to the vehicle’s electrical system, causing various operational problems.
Safety Precautions
Prioritizing safety is paramount throughout the battery replacement process. Failure to adhere to safety measures can result in severe consequences.
- Disconnect the negative terminal first to minimize the risk of electrical shock. This crucial step prevents potential electric shock hazards.
- Ensure the battery is securely held in place during removal and installation. This precaution prevents the battery from shifting or falling, reducing the chance of damage.
- Always work in a well-ventilated area to avoid potential exposure to harmful fumes. Adequate ventilation is essential to maintain a safe and healthy working environment.
Safety Precautions

Proper battery replacement necessitates meticulous adherence to safety protocols. Neglecting these precautions can lead to serious injuries, including electrical shocks and chemical burns. Understanding and diligently following the safety measures Artikeld below is paramount for a safe and successful battery replacement procedure.
Disconnecting the Battery Terminals
Safe battery disconnection is crucial to prevent electrical shocks. Improper disconnection can result in unexpected electrical discharges, causing potential harm. Always disconnect the negative (-) terminal first, followed by the positive (+). This sequence minimizes the risk of accidental contact with energized components. Using insulated tools and gloves is essential to avoid direct contact with energized parts.
Handling Battery Acid
Battery acid is highly corrosive and can cause severe skin and eye damage. Accidental spills require immediate action to mitigate potential harm. Neutralizing agents, such as baking soda or vinegar, can be used to neutralize the acid. Thoroughly rinse the affected area with copious amounts of water. If contact occurs, seek immediate medical attention.
If a spill occurs, containment and appropriate cleanup procedures should be followed.
Summary of Safety Procedures, How to replace battery ford flex limited 2018 forum
| Safety Procedure | Action | Rationale |
|---|---|---|
| Disconnecting Terminals | Disconnect the negative (-) terminal first, then the positive (+). | Reduces the risk of unexpected electrical discharges. |
| Personal Protective Equipment (PPE) | Use insulated tools and gloves. | Prevents direct contact with energized parts, reducing the risk of electrical shock. |
| Acid Spill Handling | Immediately neutralize the spill with baking soda or vinegar. Thoroughly rinse the affected area with water. | Neutralizes the acid to minimize its corrosive effects. Washing removes the acid from the skin and eyes. |
| Emergency Response | Seek immediate medical attention if contact occurs with battery acid. | Prompt medical intervention is crucial to prevent long-term health complications. |
| Proper Disposal | Dispose of the old battery according to local regulations. | Proper disposal prevents environmental contamination. |
Disconnecting the Battery
Proper battery disconnection is critical for safety during a Ford Flex Limited 2018 battery replacement. Incorrect procedures can lead to electrical shorts, potential damage to the vehicle’s electrical system, and personal injury. Adhering to the following steps ensures a safe and efficient replacement process.
Negative Terminal Disconnection Procedure
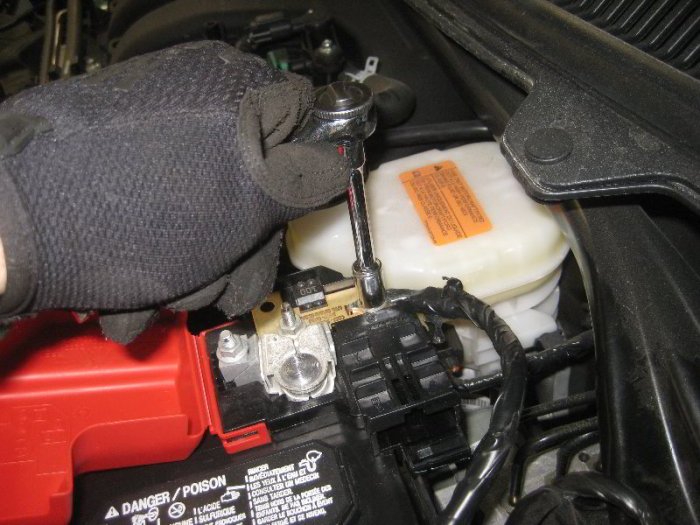
Before disconnecting any terminal, ensure the engine is off and the ignition is in the off position. This precaution prevents accidental triggering of electrical components. Carefully locate the negative (-) battery terminal, typically marked with a “-” symbol. Use a suitable wrench or socket to loosen and then disconnect the negative cable from the terminal. The negative terminal is disconnected first to prevent electrical sparking and potential damage to the vehicle’s electrical system.
Always handle the cable and terminal with care to avoid accidental damage.
Positive Terminal Disconnection Procedure
After disconnecting the negative terminal, proceed to disconnect the positive (+) battery terminal. This terminal is usually marked with a “+” symbol. Again, use a suitable wrench or socket to carefully loosen and disconnect the positive cable from the terminal. The positive terminal is disconnected last to ensure the complete removal of electrical power from the system.
Ensure the positive cable is completely disconnected from the terminal to avoid any residual electrical connections.
Importance of Correct Disconnection Order
Disconnecting the battery terminals in the correct order, negative first, then positive, is crucial for safety and preventing damage. This sequence is essential to avoid short circuits and electrical surges. Failure to adhere to this order can result in electrical sparks, potentially damaging sensitive electrical components within the vehicle. In extreme cases, it can also lead to personal injury.
For instance, a short circuit can cause a rapid and uncontrolled flow of current, leading to overheating and possible ignition of flammable materials.
Battery Terminal Disconnection Steps
| Step | Action | Safety Considerations |
|---|---|---|
| 1 | Turn off the ignition and ensure the engine is off. | Prevent accidental triggering of electrical components. |
| 2 | Locate the negative (-) battery terminal. | Identify the correct terminal to avoid confusion. |
| 3 | Using a suitable wrench or socket, loosen and disconnect the negative cable from the terminal. | Use appropriate tools to avoid damaging the cable or terminal. |
| 4 | Locate the positive (+) battery terminal. | Identify the correct terminal to avoid confusion. |
| 5 | Using a suitable wrench or socket, loosen and disconnect the positive cable from the terminal. | Use appropriate tools to avoid damaging the cable or terminal. |
Removing the Old Battery
The removal of the old battery is a crucial step in the replacement process. Proper technique is essential to prevent damage to the battery terminals, vehicle wiring, and the battery tray itself. Careful handling of the battery and its associated components throughout this procedure is paramount to ensure a safe and efficient replacement.The 2018 Ford Flex Limited’s battery placement and securing mechanisms are designed to optimize space and minimize interference with other components.
Understanding the specific configuration of the battery tray and related support structures is essential for safe and efficient removal. This section details the procedure for removing the old battery, emphasizing safety precautions and potential challenges.
Battery Securing Considerations
The battery is secured to the battery tray using various clamps and straps. Improper release of these securing mechanisms can result in damage to the battery tray or the battery itself. Furthermore, the battery’s weight and potential for movement during removal necessitate careful handling to avoid damage to the vehicle’s electrical system. This section highlights the importance of securing the battery during removal.
Step-by-Step Removal Procedure
- Disconnect the Battery Terminals: This step is crucial for safety. Refer to the prior section for detailed instructions on disconnecting the negative and positive terminals, ensuring proper sequence to avoid electrical shocks. Failure to disconnect the terminals correctly can result in electrical system damage and personal injury.
- Release Battery Tray Securing Mechanisms: The battery is often held in place by straps or clamps. Carefully locate and release all securing mechanisms. Identify any potential obstructions that might impede access to these securing mechanisms. For example, certain components might be obstructing access, requiring prior removal or disconnection.
- Support the Battery: The battery’s weight must be supported to prevent it from shifting or falling during removal. Using a suitable jack or support stand is crucial for safety and avoiding damage. Employing a sturdy support structure prevents the battery from damaging the vehicle’s undercarriage or associated components during the process.
- Remove Battery from Tray: Once the battery is supported and the securing mechanisms released, carefully remove the battery from the tray. Take care not to damage any wiring or components connected to the battery terminals or the tray. The battery should be removed smoothly and methodically, minimizing stress on all involved components.
- Handle the Old Battery: Carefully handle the old battery to prevent damage. It is recommended to use appropriate gloves for protection from potential corrosive substances or chemicals. Proper handling and care during removal are critical to prevent injury or damage.
Specific Considerations for the Ford Flex Limited 2018
The 2018 Ford Flex Limited’s battery placement might differ slightly from other models. Carefully review the vehicle’s owner’s manual for specific instructions regarding battery removal. Consult the owner’s manual for the exact location of securing mechanisms, potential obstructions, and any specific precautions for this vehicle model. Ensuring accuracy in the procedures is crucial to avoid potential issues and complications.
Installing the New Battery
Proper installation of the new battery is crucial for restoring the Ford Flex Limited 2018’s electrical system functionality and preventing potential damage. Incorrect placement or connection procedures can lead to malfunctioning electrical components, short circuits, and damage to the vehicle’s wiring. Adherence to the Artikeld steps ensures a safe and effective installation process.
Battery Alignment and Positioning
Careful alignment and positioning of the new battery are essential for optimal performance and to avoid any potential mechanical stress. The battery’s position should be secure and not subjected to excessive pressure or movement. The battery terminals should be correctly aligned with the corresponding terminals on the vehicle’s electrical system to facilitate a secure and reliable connection.
Connecting the Battery Terminals
Correct and secure connection of the battery terminals is paramount for a stable electrical system. The positive (+) terminal should be connected to the positive (+) terminal on the vehicle’s electrical system. Conversely, the negative (-) terminal should be connected to the negative (-) terminal on the vehicle’s electrical system. Incorrect polarity connection can result in damage to the vehicle’s electrical components and potentially hazardous situations.
Installation Procedure Summary
The following table summarizes the critical steps involved in installing the new battery. Adhering to this sequence ensures a safe and effective installation process.
| Step | Action | Notes |
|---|---|---|
| 1 | Prepare the Workspace: Ensure a clean and well-lit workspace. Gather necessary tools and the new battery. | Clearing the area around the battery compartment prevents accidents and facilitates the installation process. |
| 2 | Inspect the Battery Terminals: Thoroughly examine the terminals for any corrosion or debris. Clean any corrosion using a wire brush or a suitable cleaning solution. | Corrosion can impede a secure connection. Proper cleaning ensures efficient current flow. |
| 3 | Position the New Battery: Carefully align the new battery with the battery tray. Ensure proper fitment and secure positioning. | The battery’s position should be snug within the tray and not subjected to excessive pressure. |
| 4 | Connect the Positive (+) Terminal: Attach the positive (+) terminal cable to the corresponding positive (+) terminal on the vehicle’s electrical system. | Connecting the positive terminal first minimizes the risk of electrical shock. |
| 5 | Connect the Negative (-) Terminal: Attach the negative (-) terminal cable to the corresponding negative (-) terminal on the vehicle’s electrical system. | Connecting the negative terminal last is a best practice. |
| 6 | Secure the Battery: Ensure the battery is firmly seated within the tray and is not loose. Tighten any securing mechanisms as necessary. | A secure battery prevents movement and potential damage during operation. |
| 7 | Check Connections: Verify that all connections are tight and secure. Inspect for any signs of corrosion or loose connections. | This final inspection ensures a reliable electrical connection. |
| 8 | Reconnect Electrical Components: Reconnect all electrical components and systems that were disconnected during the battery removal process. | Proper reconnection of all systems is vital for the vehicle’s operation. |
Testing and Verification
Post-installation verification is crucial to ensure the battery replacement was successful and all electrical systems function correctly. Proper testing validates the integrity of the new battery and the restored functionality of the vehicle’s electrical network. This process involves systematically checking voltage levels and confirming the operation of various electrical components.
Battery Voltage Testing
Accurate voltage measurement is fundamental to assess the battery’s health and readiness for operation. Employ a high-accuracy digital multimeter set to the DC voltage measurement function. Connect the multimeter’s leads to the battery terminals, ensuring a firm connection. The reading should reflect the expected voltage for a fully charged battery, typically exceeding 12.6 volts. Variations from this value may indicate issues with the battery or its charging system.
A significantly lower voltage necessitates further investigation.
Electrical System Functionality Check
Verification of the vehicle’s electrical systems after battery replacement is vital. This comprehensive check ensures that all electrical components function as expected. A systematic approach to verifying the system’s operation is essential. This involves examining various electrical components for proper operation.
Comprehensive Electrical Component Verification
A thorough assessment of the vehicle’s electrical components is necessary. The following list details the components requiring verification after battery replacement. Failure to address any of these components could lead to malfunctions in other parts of the vehicle.
- Headlights: Verify that both low-beam and high-beam headlights function correctly, ensuring brightness and clarity. Ensure proper operation of the turn signals and brake lights.
- Interior Lighting: Inspect the operation of all interior lights, including the dome light, map lights, and any other interior illumination.
- Accessories: Assess the functionality of all electrical accessories, such as power windows, power locks, and power mirrors. Operation should be smooth and consistent, with no erratic behavior. Proper functioning of the wipers and washer system should also be confirmed.
- Audio System: Verify the operation of the audio system, including the radio, speakers, and CD player (if applicable). Sound quality and clarity should be within expected parameters. Also, ensure the operation of any auxiliary inputs.
- Gauges: Confirm the accurate display of all instrument panel gauges. Crucial gauges like the speedometer, fuel gauge, and temperature gauge must provide reliable readings.
- Other Electrical Components: Conduct a thorough check of any other electrical components, such as the clock, and any vehicle-specific features.
Troubleshooting Common Issues

Post-battery replacement, the Ford Flex Limited 2018’s electrical system may exhibit various anomalies. Thorough diagnostics are crucial to pinpoint the root cause and ensure proper functionality. This section details common problems, troubleshooting methods, and solutions for effective system recovery.
Electrical System Malfunctions
Incorrect connections or improper installation procedures can lead to electrical system failures. Symptoms may range from simple warning lights to complete system shutdown. Careful inspection and meticulous testing are vital to isolate the issue.
- No Start Condition: A critical issue, no start can stem from various causes. Incorrect battery terminal connections, a faulty starter motor, or a damaged alternator can all contribute to this problem. Comprehensive testing, including verifying battery voltage, checking starter motor operation, and inspecting alternator output, is necessary to identify the root cause. Insufficient battery capacity or a damaged battery cable are other potential reasons.
- Malfunctioning Accessories: Post-replacement, certain accessories might fail to operate. This can be due to a loose or corroded connection within the electrical circuit. Checking the connections to affected accessories, like power windows or the radio, and ensuring proper grounding are vital steps. Additionally, a blown fuse in the relevant circuit could be the cause.
- Dashboard Warning Lights: Post-replacement, various warning lights may illuminate on the dashboard. These lights often signal an electrical imbalance or a malfunction in the car’s systems. Checking the battery voltage and comparing it to the specifications, checking fuses, and inspecting the wiring harness for damage or loose connections are essential troubleshooting steps. The diagnostic trouble codes (DTCs) stored in the car’s computer can provide additional insight into the issue.
Battery Terminal Issues
Improper battery terminal connections are a frequent source of electrical problems. Loose connections, corroded terminals, or damaged cables can severely hinder electrical flow. This section focuses on identifying and rectifying these problems.
- Corrosion: Corrosion on battery terminals can impede current flow. Thorough cleaning of the terminals, using a wire brush or sandpaper, is necessary to restore conductivity. Ensure terminals are properly coated with a dielectric grease after cleaning for optimal protection.
- Loose Connections: A loose battery terminal connection will prevent a steady current flow. Tightening the terminals and ensuring they are secure is crucial. Inspect the cables for any signs of damage or fraying.
- Damaged Cables: Damaged battery cables, either at the battery or along the route, can create electrical resistance, hindering current flow. Checking for any visible damage and replacing the cables if needed is critical.
Electrical System Diagnosis
Properly diagnosing electrical issues involves several steps. This section provides guidance on using diagnostic tools and interpreting results.
- Voltage Measurement: Measuring the voltage across the battery terminals with a multimeter is essential. A significantly lower voltage than the expected value may indicate a problem with the battery or its connections.
- Load Testing: A load test, using a specific device, assesses the battery’s ability to supply current under load. This can reveal issues that might not be apparent during a simple voltage measurement.
- Diagnostic Trouble Codes (DTCs): Accessing and interpreting DTCs can pinpoint the specific electrical component or system causing the problem. Use a scan tool capable of reading and clearing DTCs for accurate diagnostics.
Additional Tips and Considerations
Completing a battery replacement requires careful attention to detail beyond the procedural steps. Optimizing the replacement process and ensuring long-term battery health are crucial for the Ford Flex Limited 2018. This section delves into essential considerations for a successful and enduring outcome.Proper battery selection and maintenance directly impact the vehicle’s electrical system and overall performance. Understanding the nuances of battery types and their suitability for the Ford Flex Limited 2018 is paramount to avoiding potential issues.
Battery Selection Criteria
Selecting the correct replacement battery is critical. The new battery must meet the specifications of the Ford Flex Limited 2018, ensuring compatibility with the vehicle’s electrical system. Incorrect sizing or chemistry can lead to performance problems, premature failure, or even damage to other components. The correct battery type and amperage rating are essential.
Battery Maintenance for Long-Term Performance
Maintaining a healthy battery is key to its longevity. Regular checks, proper storage, and environmental considerations play a significant role.
- Regular Visual Inspection: Visually inspect the battery terminals for corrosion. Corrosion reduces conductivity and can cause performance degradation. Promptly address any corrosion with a wire brush and a terminal cleaner.
- Proper Storage: If the vehicle will be parked for extended periods, consider disconnecting the battery to minimize drain and prevent possible damage. Proper storage conditions, such as avoiding extreme temperatures, are crucial for optimal performance.
- Environmental Considerations: Extreme temperatures, both hot and cold, can negatively impact battery performance. Storing the vehicle in a climate-controlled environment is ideal for preserving battery life.
Comparison of Battery Types
Different battery types offer varying characteristics in terms of performance and longevity.
| Battery Type | Characteristics | Suitability for Ford Flex Limited 2018 |
|---|---|---|
| AGM (Absorbent Glass Mat) | Known for superior performance in extreme temperatures, high resistance to vibration, and minimal leakage. | Excellent choice, especially in regions with fluctuating temperatures, as the AGM design can withstand the rigors of a Ford Flex. |
| Flooded Lead-Acid | Traditional design, generally less expensive. | Suitable, but potentially less resilient to extreme temperatures or vibrations compared to AGM. May require more frequent maintenance. |
| Lithium-ion | High energy density, lighter weight, faster charging, and longer lifespan. | While a potentially excellent long-term option, the higher cost might not be justified for a vehicle replacement in the context of a routine battery replacement. |
Note: The optimal choice depends on factors such as the vehicle’s electrical system demands, local climate, and budget.
Troubleshooting Potential Issues
Troubleshooting any post-replacement issues is important. Common issues may stem from incorrect battery selection or installation.
- Electrical System Malfunctions: If the vehicle experiences unusual electrical issues after the replacement, a thorough inspection of the connections and wiring is warranted.
- Poor Starting Performance: If the vehicle struggles to start, the new battery’s terminal connections should be checked for corrosion and tightness. Ensure the battery cables are properly secured.
Community Forum Discussion
Ford Flex Limited 2018 battery replacement frequently elicits diverse queries and solutions on online forums. Users often share their experiences, encountered difficulties, and proposed workarounds, offering valuable insights into potential pitfalls and best practices. This section delves into common forum threads, analyzing the proposed solutions and highlighting potential challenges associated with the replacement process.
Common User Concerns Regarding Battery Terminal Connections
Forum discussions frequently highlight concerns about the correct procedure for disconnecting and reconnecting battery terminals. Incorrect disconnect sequences can potentially damage sensitive electrical components, or result in improper reconnection, which may lead to further issues. Users often express uncertainty about the specific order of terminal disconnection and the necessity for thorough cleaning.
- Incorrect Terminal Disconnect Sequence: Some users reported inadvertently disconnecting the wrong terminal first, potentially causing electrical surges or damage to the vehicle’s electrical system. This highlights the importance of adhering to the prescribed sequence, often depicted in the vehicle’s repair manual.
- Terminal Corrosion: Forum posts frequently mention the presence of corrosion on the battery terminals. This corrosion can impede proper electrical contact, affecting the battery’s ability to deliver power. Users often recommend thorough cleaning of the terminals with a wire brush and terminal cleaner to mitigate this issue. Ignoring this step can result in a weak connection and a faulty battery system.
- Tightening Torque: Several users queried the appropriate tightening torque for the battery terminal clamps. Incorrect tightening can result in either loose connections or damaged terminals. The specified torque is crucial for a secure connection without stressing the components. Insufficient tightening can lead to intermittent issues, while excessive force can damage the terminal. It’s essential to use the correct tools to ensure the correct torque.
Potential Issues in the Replacement Process Based on User Feedback
Analysis of user forum discussions reveals several potential problems during the battery replacement procedure. These include:
- Incorrect Battery Sizing: Some users incorrectly replaced the battery with a different amperage or size than specified for the Ford Flex Limited 2018. This incompatibility can result in reduced performance, charging issues, or even damage to the vehicle’s electrical system. Selecting a battery matching the vehicle’s specifications is critical.
- Incorrect Battery Mounting: Some users reported difficulties in properly aligning and securing the new battery in its housing. This can lead to insufficient support, causing damage to the battery or electrical components. Proper alignment and securing of the battery in its mounts are vital for proper function.
- Negative Terminal Connection Issues: Forum discussions often highlight challenges in connecting the negative terminal correctly, including potential damage to the battery tray or wiring. Properly connecting the negative terminal is crucial to preventing short circuits and ensuring the electrical system functions correctly.
Analysis of Proposed Solutions in the Forum
User-proposed solutions within the forum demonstrate a spectrum of approaches. Some are sound, others are less effective or even potentially harmful.
- Comprehensive DIY Guide References: Users frequently cited online guides and manuals as a reference for the process. This demonstrates a reliance on readily available resources for correct procedures. The accuracy and completeness of these guides should be verified before adoption.
- Troubleshooting Techniques: Some users discussed employing diagnostic tools to isolate the source of the issue. This suggests an attempt to pinpoint the root cause of the problem. Diagnostic tools can be valuable in identifying subtle electrical issues.
- Seeking Expert Advice: Users also sought assistance from experienced mechanics or forum moderators. This illustrates the recognition of the complexity of the task and the need for external expertise. Seeking professional help for critical steps is recommended.
Summary of Forum Threads
| Issue | User Solution | Analysis |
|---|---|---|
| Incorrect terminal disconnect | Following online guides | Valid solution, but verify guide’s accuracy |
| Corrosion on terminals | Thorough cleaning | Crucial for good electrical contact |
| Incorrect battery sizing | Matching battery specifications | Essential for proper vehicle function |
Conclusion
In conclusion, replacing a Ford Flex 2018 battery, while potentially daunting, becomes manageable with careful planning and adherence to the steps Artikeld in this comprehensive guide. By meticulously following safety precautions, utilizing the detailed procedures, and troubleshooting any potential issues, you can successfully replace your vehicle’s battery and restore its functionality. The insights gleaned from the dedicated forum community further enhance this guide, offering valuable solutions and insights based on real-world experiences.
Remember to prioritize safety throughout the entire process.
FAQ Section: How To Replace Battery Ford Flex Limited 2018 Forum
Q: What safety equipment is essential for this procedure?
A: Safety glasses, gloves, and appropriate footwear are crucial for preventing injury. Ensure you have a well-ventilated workspace and avoid working in direct sunlight.
Q: What are common causes of battery replacement failure?
A: Incorrect terminal connection order, improper battery handling, and neglecting safety precautions are among the most frequent causes of issues during battery replacement.
Q: Where can I find detailed diagrams of the battery location on my Ford Flex 2018?
A: Specific diagrams are best found in the vehicle’s owner’s manual or online through reliable automotive repair resources.
Q: What is the typical lifespan of a Ford Flex 2018 battery?
A: Battery lifespan varies depending on usage and environmental conditions. Consult your owner’s manual for a more precise estimate.