 Nimila
How to replace an alternator pulley? This guide breaks down the whole process, from understanding the basics to tackling potential problems. We’ll walk you through the steps, covering everything from safety precautions to troubleshooting common issues. Get ready to conquer this auto repair task with confidence!
The alternator pulley is a crucial component in your car’s electrical system. It’s what keeps your battery charged and your lights on. A worn or damaged pulley can lead to a whole host of problems, from annoying noises to serious electrical issues. This guide is your comprehensive resource to handle this repair like a pro!
Introduction to Alternator Pulley Replacement
The alternator pulley is a crucial component in your vehicle’s electrical system. It’s essentially a gear that sits on the alternator’s shaft and is driven by the engine’s crankshaft. This drive mechanism is essential for generating the electricity needed to power your car’s electrical accessories, lights, and even charge the battery. A smooth and well-functioning pulley is vital for a healthy electrical system.A failing alternator pulley can lead to a cascade of problems.
A worn or damaged pulley can cause unusual noises, like a grinding or squealing sound, which are often the first signs of trouble. Beyond noise, you might experience charging issues, such as a dimming dashboard, flickering lights, or a battery that struggles to maintain a charge. Vibrations are another telltale sign; a wobbly pulley can cause the engine to shake or vibrate more noticeably.
These issues often escalate, requiring more significant repairs if ignored.
Alternator Pulley Failure Symptoms
Signs of a failing or damaged alternator pulley often include unusual sounds and electrical issues. These symptoms can be subtle initially but can escalate quickly. Grinding, squealing, or rattling noises emanating from the engine compartment are clear indicators of pulley wear. These noises usually worsen with engine speed. Beyond sound, electrical problems, such as dim headlights, inconsistent charging, or a battery that won’t hold a charge, might also point to a failing pulley.
Additionally, unusual engine vibrations, particularly at higher speeds, could be a sign of a problem with the pulley.
Tools and Materials Needed
Replacing an alternator pulley typically requires a specific set of tools and materials. The exact tools may vary slightly based on your vehicle’s make and model, but the general list usually includes:
- Socket wrenches and/or ratchets
- Torque wrench
- Pliers
- Pry bar (for removing old pulley)
- New alternator pulley
- New belt (if needed)
- Safety glasses
- Gloves
- Jack stands
- Jack
- Drain pan
Having these tools readily available is essential to ensure a safe and efficient repair process. Proper tool selection and usage are paramount to avoid further damage to your vehicle.
Replacement Procedure Flowchart
This flowchart illustrates the basic steps involved in replacing an alternator pulley. Remember to consult your vehicle’s specific repair manual for precise instructions tailored to your make and model.
| Step | Action |
|---|---|
| 1 | Prepare the vehicle. Raise the vehicle using a jack and support it with jack stands. Disconnect the battery terminals. |
| 2 | Remove the old serpentine belt. |
| 3 | Remove the old pulley using the appropriate tools and techniques. This usually involves removing the retaining bolts and/or using a pulley removal tool. |
| 4 | Inspect the alternator and pulley surfaces for damage. |
| 5 | Install the new pulley, ensuring proper alignment and securing the retaining bolts. |
| 6 | Install the new serpentine belt. Ensure it fits correctly and is properly tensioned. |
| 7 | Lower the vehicle and reconnect the battery terminals. |
| 8 | Start the vehicle and check for proper charging and operation. |
Vehicle-Specific Considerations

Replacing an alternator pulley isn’t a one-size-fits-all process. Different vehicles have unique layouts and requirements. Understanding these variations is crucial for a successful and safe repair. From compact cars to large trucks, the accessibility and complexity of the task can change dramatically. Knowing what to expect ahead of time will save you time, frustration, and potential damage.
Vehicle manufacturers design their vehicles with different priorities, and these priorities will often dictate how the alternator and its pulley are mounted. Some vehicles might require specialized tools or techniques to remove the alternator from the engine bay. Understanding these differences ensures you tackle the job with the correct approach.
Alternator Removal Methods Across Vehicle Types
Different vehicle types present unique challenges when removing the alternator. Front-engine, rear-engine, and even mid-engine configurations all have varying access points and component arrangements. Understanding these differences is key to efficient and safe removal.
- Front-Engine Vehicles: Typically, front-engine vehicles have more straightforward access to the alternator, with the components often positioned in the front of the engine compartment. This usually allows for easier removal and replacement, but specific procedures may vary depending on the make and model.
- Rear-Engine Vehicles: In rear-engine vehicles, the alternator’s position might be further back or to the side of the engine compartment. Access to these components might be limited, requiring careful maneuvering and potentially more specialized tools or procedures.
- Mid-Engine Vehicles: Mid-engine layouts are unique, often with the engine placed centrally. This can impact access and require careful planning to ensure the alternator can be safely removed and replaced without damaging surrounding components or wiring.
Variations in Torque Specifications
Torque specifications are critical for ensuring the proper tightening of fasteners during alternator pulley replacement. Incorrect torque can lead to damage to the components or, worse, cause problems with the vehicle’s electrical system. It’s vital to adhere to the specific torque values recommended by the vehicle manufacturer for each fastener.
These specifications are crucial for preventing damage and ensuring the long-term reliability of the repaired vehicle. Failure to follow these instructions could lead to significant issues down the line, including premature component failure, or even safety concerns.
| Vehicle Make & Model | Fastener Type | Torque Specification (ft-lbs) |
|---|---|---|
| Toyota Camry (2018) | Alternator Mounting Bolts | 10-15 |
| Honda Civic (2020) | Alternator Mounting Bolts | 12-18 |
| Ford F-150 (2022) | Alternator Mounting Bolts | 20-25 |
Note: Always consult your vehicle’s repair manual for the most accurate and up-to-date torque specifications. These are just examples.
Unique Challenges in Certain Vehicle Designs
Some vehicle designs present specific challenges during alternator pulley replacement. These include limited access, complex engine configurations, and specialized tools.
- Limited Access: Some vehicles, particularly older models or those with tight engine compartments, might require creative maneuvering and the use of specialized tools to gain access to the alternator. This can involve using tools that offer leverage or a specific angle for reaching fasteners or components.
- Complex Engine Configurations: Vehicles with intricate engine configurations, such as those with various interconnecting components, require careful planning to avoid damage. Understanding the layout of the engine bay and the location of crucial components is paramount to avoiding complications during removal and replacement.
- Specialized Tools: Certain vehicle designs might necessitate the use of specific tools for alternator removal. This could include specialized sockets, pullers, or even tools designed for specific components.
Safety Precautions and Preparation
Before diving into the alternator pulley replacement, let’s prioritize safety. A well-prepared workspace and adherence to safety precautions can prevent potential accidents and ensure a smooth, successful repair. Remember, safety is paramount in any automotive repair.
Disconnecting the Battery
Properly disconnecting the battery is crucial for safety. A discharged battery can still contain enough energy to cause a spark, potentially leading to a fire or electrical shock. Always disconnect the negative (-) terminal first, followed by the positive (+). This prevents accidental short circuits. Ensure the battery terminals are completely disconnected and free from any contact.
This precaution will safeguard you from electrical hazards.
Using Appropriate Safety Gear
Protecting yourself with appropriate safety gear is essential. Heavy-duty work gloves shield your hands from sharp edges, abrasions, and potential chemical exposure. Safety glasses or goggles prevent foreign particles, debris, or splashes from entering your eyes, maintaining clear vision throughout the repair process. This is a standard safety measure that should never be overlooked.
Preparing the Workspace
A well-organized and safe workspace minimizes the risk of injury. Clear the area around the engine compartment of any unnecessary tools, equipment, or materials. Ensure good lighting to enhance visibility during the repair. Use a jack stand or equivalent support to safely lift the vehicle and maintain stability during the work. A designated workspace will facilitate a smooth repair process.
Supporting Engine Components
Supporting the engine and other components is vital for preventing damage and ensuring safety. Use jack stands positioned correctly and securely under the vehicle’s frame to lift the vehicle. Avoid placing weight on any part of the vehicle that is not designed to support it. Proper support for the engine and associated components will prevent any unexpected damage during the replacement procedure.
This ensures the stability of the vehicle and the safety of the worker.
Additional Safety Considerations
Always check the vehicle’s manual for specific safety procedures related to your make and model. Understand the potential hazards associated with the repair process and take appropriate precautions to mitigate them. Be mindful of your surroundings and maintain a safe working distance from potential hazards. Knowing the specific safety requirements for your vehicle model will ensure a safe repair environment.
Disassembly Steps
Alright, wrench-wielding wizards! Now that you’ve prepped your workspace and gathered your tools, it’s time to dive into the nitty-gritty of alternator pulley removal. Remember, safety first! Follow each step meticulously, and you’ll be swapping that pulley like a pro in no time.
Disconnecting Electrical Connections
Properly disconnecting electrical connections is crucial to prevent accidental short circuits and potential damage. Incorrect procedures can lead to costly repairs or even personal injury. Carefully identify and label each wire to ensure correct reconnection later. Failure to do this could result in improper functionality.
- Locate the alternator’s electrical connections. These are usually visible bolted to the alternator itself. Use insulated tools to avoid any risk of electrical shock.
- Carefully disconnect each wire from the alternator terminals. Take note of the wire’s position and the connection type to ensure correct reinstallation. This might involve removing terminal caps.
- Once disconnected, place the wires aside in a safe, organized manner, ensuring no wires are touching each other or other metal parts. Using wire markers can help tremendously in this process.
Removing Mounting Bolts
Precise removal of mounting bolts is essential for a smooth replacement process. Incorrect torque can damage the alternator or surrounding components.
| Step | Tools Required | Potential Challenges/Difficulties | Torque Specifications |
|---|---|---|---|
| 1 | Socket wrench set, ratcheting wrench, extension, torque wrench | Tight bolts, corrosion, damaged threads | Refer to your vehicle’s repair manual or a reliable online resource. Always use a torque wrench, not just a socket wrench. |
| 2 | Torque wrench | Ensuring proper torque to avoid damaging the alternator mount or threads. Over-tightening can damage the part | Use the specified torque value from your vehicle’s repair manual or a trusted source. |
| 3 | Pry bar (optional), impact driver | Tight bolts, stubborn fasteners, damaged threads | Verify the correct torque value for each bolt. Using the wrong torque can damage the alternator or the surrounding components. |
A torque wrench is indispensable for ensuring each bolt is tightened to the manufacturer’s recommended specifications. Incorrect torque can cause issues ranging from a loose connection to serious damage to the alternator or other components. Always consult your vehicle’s repair manual for precise torque values.
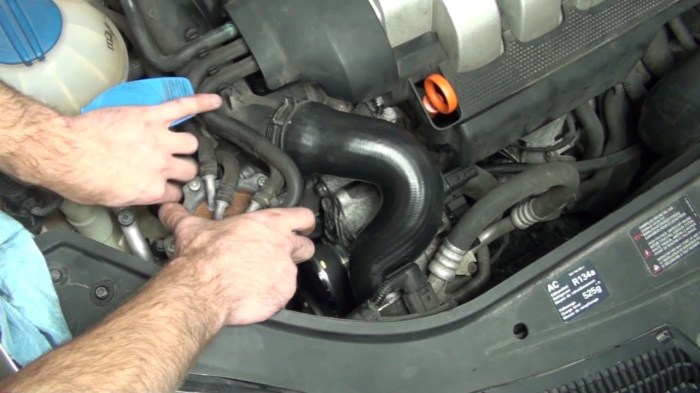
Removing the Serpentine Belt
Removing the serpentine belt is a crucial step, as it prevents damage to the alternator and other accessories. Follow these steps carefully:
- Locate the serpentine belt tensioner pulley and the idler pulleys. They’re critical to proper belt tension and alignment.
- Identify the tensioner and release lever on the belt tensioner. Release the tensioner lever to loosen the belt. This may involve using a specific tool for your vehicle.
- Carefully guide the serpentine belt off the pulleys. Ensure the belt doesn’t get pinched or caught on anything. Use a plastic pry bar if necessary.
Properly removing the serpentine belt ensures that no part is damaged and that it’s safely stored until the replacement.
Alternator Pulley Replacement
Installing a new alternator pulley is a crucial step in maintaining your vehicle’s electrical system. This process requires careful attention to alignment and torque specifications to ensure optimal performance and prevent damage. Proper installation ensures the alternator functions correctly, charging the battery and powering accessories. Skipping these steps could lead to electrical problems and costly repairs down the line.The following steps detail the installation process, focusing on precise alignment, proper torque application, and serpentine belt installation.
A precise and well-executed installation is essential for long-term vehicle health.
Installing the New Alternator Pulley
The success of the alternator pulley replacement hinges on meticulous alignment and torque application. First, carefully position the new pulley onto the alternator shaft, ensuring it aligns correctly with the existing mounting points. Use appropriate tools to ensure a secure fit without excessive force, potentially damaging the shaft or the pulley. Incorrect alignment could lead to uneven wear and tear on components.Once the pulley is securely seated, proceed to tighten the mounting bolts.
Consult your vehicle’s repair manual for the correct torque specifications, which vary depending on the vehicle make and model. Over-tightening can strip the threads, and under-tightening will result in the pulley loosening. Applying the correct torque ensures a stable and secure connection.
Comparing Alternator Pulley Types
Different alternator pulleys cater to varying applications and vehicle specifications. Choosing the right pulley is critical for performance and reliability.
| Pulley Type | Material | Suitability | Advantages | Disadvantages |
|---|---|---|---|---|
| Steel | Steel | Heavy-duty applications, trucks, SUVs | Durable, robust, good for high-stress environments | Heavier weight, potentially less efficient |
| Aluminum | Aluminum Alloy | Most passenger vehicles, lightweight applications | Lightweight, efficient, good heat dissipation | May be less durable in high-stress applications |
| Composite | Composite material | Vehicles with high belt speeds, applications requiring quiet operation | Lightweight, potentially quieter operation, better heat dissipation than steel | May have limited durability compared to steel, may not be ideal for heavy-duty applications |
Proper selection depends on the specific needs of your vehicle.
Precise Alignment and Torque Application
Accurate alignment is paramount during pulley installation. Misalignment can cause premature wear and tear on the serpentine belt and other components, leading to expensive repairs. Use appropriate tools and refer to your vehicle’s repair manual for precise alignment procedures. Employing alignment tools and techniques ensures the components function optimally.
Precise alignment is critical for proper belt tension and alternator operation.
Proper torque application is equally vital. Using a torque wrench ensures you apply the correct amount of force, preventing damage to the mounting bolts and threads. Refer to your vehicle’s repair manual for the recommended torque values for each bolt. Improper torque application can lead to loosening, breakage, and eventual component failure.
Serpentine Belt Installation
Correct serpentine belt installation is crucial for smooth operation and long-term reliability. Ensure the belt aligns correctly with all pulleys, following the routing diagram in your vehicle’s repair manual. Proper alignment prevents slippage and reduces stress on the belt and components.Carefully guide the belt onto the pulleys, ensuring a snug fit without undue tension. Pay close attention to the tensioner and idler pulleys, adjusting them to achieve the proper belt tension.
Excessive belt tension can cause damage, and insufficient tension can result in belt slippage.The serpentine belt’s proper installation ensures smooth and reliable power transmission from the engine to the alternator.
Reassembly and Testing
Now that the old alternator pulley is history, let’s get this show back on the road! Reassembling the alternator correctly is crucial for optimal performance and preventing further issues down the line. Proper belt tension and alignment are paramount, ensuring smooth operation and longevity of the system. Testing the alternator’s charging capabilities after reassembly guarantees a fully functional charging system, vital for your vehicle’s electrical components.Thorough reassembly and subsequent testing will ensure the alternator operates flawlessly, preventing electrical problems and extending the life of your vehicle’s electrical system.
This meticulous process guarantees the alternator is properly integrated into your vehicle’s system.
Reconnecting Electrical Connections
Careful attention to detail is vital during the reconnection process. Incorrect wiring can lead to malfunctions or even damage. Ensure all electrical connections are secure and properly tightened. This includes the alternator’s wiring harness, ground connections, and any associated sensors. Double-check all terminals for corrosion or damage, and clean them thoroughly if necessary.
A clean connection is a reliable connection.
Reassembling the Alternator, How to replace an alternator pulley
Before placing the alternator back into the engine compartment, ensure all components are in their correct positions. This includes the alternator’s mounting brackets, the alternator pulley, and any associated hardware. Pay close attention to the alignment of the alternator to the engine and ensure it’s securely fastened to its mounting points.
Ensuring Proper Belt Tension and Alignment
Incorrect belt tension can lead to premature wear and tear on the belt and related components. Over-tensioning can damage the belt, while under-tensioning can cause slipping and insufficient charging. Refer to your vehicle’s repair manual for the correct belt tension specifications. A properly tensioned belt will provide optimal power transmission and efficient charging.
- Use a tension gauge to measure the belt tension, ensuring it falls within the manufacturer’s recommended range.
- Visually inspect the belt for any signs of damage, such as cracks or fraying.
- Verify the alignment of the belt with the pulleys, ensuring smooth contact and minimizing friction.
- A well-aligned belt will contribute to a more efficient charging system and prolonged belt lifespan.
Testing the Alternator’s Functionality
Proper testing is essential to verify the alternator’s functionality after the repair. This involves checking the alternator’s output voltage and current to ensure they meet the required specifications.
- Use a multimeter to measure the voltage output of the alternator when the engine is running. The reading should match the specifications in your vehicle’s repair manual.
- Ensure the voltage output remains stable and within the acceptable range throughout the engine’s operating speed range. A fluctuating output might indicate an issue with the alternator’s internal components or wiring.
- This testing step will guarantee the alternator is providing sufficient electrical power to your vehicle’s system.
Reconnecting the Battery and Running the Vehicle
Reconnecting the battery and running the vehicle allows for a comprehensive test of the charging system. Observe the charging system’s performance under actual operating conditions.
- Reconnect the battery cables securely and double-check for proper connections.
- Start the engine and let it run for a few minutes. Monitor the voltage gauge to ensure it’s within the normal range, typically between 13.8 and 14.5 volts.
- If the voltage remains stable and within the required parameters, the charging system is functioning correctly.
- A fluctuating voltage might indicate a problem that needs further investigation.
Troubleshooting Common Issues
Replacing an alternator pulley, while often straightforward, can sometimes lead to unexpected challenges. Understanding potential problems and their solutions is crucial for a successful repair and a properly functioning charging system. This section details common issues, how to identify them, and how to address them effectively.Identifying problems during the replacement process, like stripped bolts or damaged components, is vital.
Ignoring these issues can lead to further complications and potentially more expensive repairs down the line. Knowing how to diagnose and fix these problems is a key skill for any DIY mechanic.
Potential Issues During Disassembly
Addressing potential problems during disassembly is essential to prevent further complications. Stripped bolts are a common issue, especially in older vehicles. A stripped bolt can be a real headache, requiring careful attention and potentially specialized tools to remove. Proper torque specifications are critical to prevent damaging the alternator or other components. If you suspect a stripped bolt, consider using specialized bolt extractors or, in extreme cases, replacing the damaged fastener.
Damaged Components
Damage to the alternator pulley itself or surrounding components is another potential issue. A damaged pulley may have cracks or misalignments. This can lead to problems with belt tension and potentially damage to the belt itself. If you find any damage, sourcing a replacement pulley is necessary. Consult your vehicle’s repair manual or a reliable parts supplier for accurate part numbers.
Be sure to order the correct pulley for your specific make and model.
Charging System Issues Post-Replacement
Ensuring the charging system functions correctly after the replacement is crucial. A common problem is a faulty connection, causing the alternator to not charge properly. Double-check all wiring connections and ensure they are secure. A multimeter can be used to verify voltage output from the alternator. Refer to your vehicle’s repair manual for the expected output values.
If the alternator is not charging, consult the charging system troubleshooting section in your repair manual for more detailed guidance.
Troubleshooting Table
| Issue | Possible Cause | Solution |
|---|---|---|
| Alternator not charging | Loose or corroded connections, faulty alternator, damaged pulley | Check all connections, replace the alternator if faulty, replace the pulley if damaged. |
| Stripped bolts | Over-tightening, damaged threads | Use bolt extractors or replace the bolt. |
| Belt slippage | Damaged belt, incorrect tension, damaged pulley | Replace the belt, adjust tension, replace the pulley. |
| Strange noises during operation | Loose components, damaged bearings, worn components | Tighten loose components, replace damaged components. |
| Alternator pulley misalignment | Damaged pulley, improper reassembly | Replace the pulley, ensure proper reassembly procedure. |
Charging System Troubleshooting Steps
- Verify all electrical connections are secure and corrosion-free. Loose connections are a frequent culprit.
- Check the voltage output from the alternator using a multimeter. Ensure the voltage meets the specifications in your vehicle’s repair manual.
- Inspect the battery terminals for corrosion and clean them thoroughly. Clean terminals can make a big difference in electrical conductivity.
- Ensure the alternator belt is properly tensioned. Incorrect belt tension can lead to poor charging performance.
- If the issues persist, consult your vehicle’s repair manual or a qualified mechanic for further assistance. Don’t hesitate to seek professional help if needed.
Alternative Methods (Optional)
Sometimes, the standard alternator pulley removal methods might encounter unexpected resistance. This could be due to seized bolts, damaged tools, or simply a particularly stubborn design. Fortunately, there are alternative approaches to consider when the initial plan isn’t working. These techniques can be valuable troubleshooting tools to get the job done effectively.
Comparing Pulley Removal Methods
Different methods for removing and replacing an alternator pulley offer varying levels of complexity and effectiveness. Choosing the right method depends on the specific vehicle and the challenges encountered. For instance, using a pulley puller might be quicker but requires specific tools, while using a combination of leverage and impact tools could prove more time-consuming but might be necessary for stubborn cases.
Careful consideration of the pros and cons of each approach is essential.
Alternative Techniques for Removal and Replacement
In situations where the standard procedure encounters obstacles, alternative techniques can provide a solution. These techniques often involve applying additional force, employing different leverage points, or utilizing specialized tools.
- Using a Press: A hydraulic press can be a powerful tool for removing or installing a pulley if the design allows for press fit. This method requires careful alignment and precise force application to avoid damage. It is crucial to ensure the press is appropriately sized and the components are adequately supported to prevent any deformation or breakage.
- Heat Application: Applying heat to the pulley or the surrounding area can sometimes help loosen stubborn components. This is generally recommended for situations where other methods are ineffective and needs careful consideration to avoid warping the metal parts. This method must be used cautiously, as the heat can potentially damage adjacent components or the pulley itself. Always ensure the heat source is appropriate for the specific material being worked on and is applied for a controlled duration.
- Impact Wrench/Sockets: Using an impact wrench and appropriate sockets can sometimes be effective for loosening or tightening bolts that are resisting conventional methods. Ensure the impact wrench’s settings are appropriate to prevent damage to the bolt or other components. A controlled application of impact is crucial to avoid causing damage to the surrounding components.
Troubleshooting Flowchart
This flowchart helps guide you through various scenarios when encountering issues during pulley replacement. This example shows a basic approach.
| Scenario | Possible Cause | Action |
|---|---|---|
| Pulley won’t budge | Seized bolts, damaged pulley, or improper tool | Try different tools, apply heat (with caution), use a press (if applicable), or consult a manual for specific solutions. |
| Tools damaged | Incorrect tool selection, excessive force | Use appropriate tools, apply force gradually, consider alternative techniques, or replace damaged tools. |
| Component damage during removal | Incorrect techniques, improper force application | Reassess the removal process, consult a manual, or seek professional assistance. |
Last Word: How To Replace An Alternator Pulley
Replacing an alternator pulley might seem daunting, but this guide simplifies the process, offering clear steps and addressing potential challenges. By following the advice here, you can tackle this job with confidence, saving yourself time and money. Remember to prioritize safety throughout the process! Now you’re equipped to take on any pulley replacement project.
Clarifying Questions
What tools do I need besides the obvious ones like screwdrivers and wrenches?
You’ll likely need a torque wrench, a serpentine belt tensioner tool, and potentially a pulley alignment tool, depending on the vehicle. These tools help ensure proper tightening and alignment for optimal performance.
What if I can’t get the belt off?
Sometimes, the belt is stubborn. Try loosening the tensioner pulley first, then use a belt-removal tool to carefully disengage the belt from the pulley. If it’s still stuck, use a pry bar (with extreme caution) or a different method to release the tension.
How do I know if the pulley is truly the problem?
Check for unusual noises (grinding, squealing), dimming lights, or difficulty starting the engine. If the charging system isn’t working correctly, it’s worth investigating the pulley. Often, other symptoms can indicate the problem, so consider a thorough check.
What are some common mistakes people make during this process?
Skipping safety precautions, using incorrect torque settings, and not properly aligning components are frequent mistakes. Also, forgetting to disconnect the battery can lead to dangerous shocks.


