

How to remove quicksilver throttle control wire diagame – How to remove quicksilver throttle control wire diagram: A meticulous guide for understanding, diagnosing, and expertly removing your Quicksilver throttle control wire. This comprehensive guide dives deep into the intricacies of this vital component, from its basic function to complex troubleshooting steps. Prepared with detailed explanations and visuals, this article ensures a smooth and safe removal process.
This comprehensive guide provides a step-by-step approach to removing your Quicksilver throttle control wire, ensuring you have all the necessary information to complete the task successfully. Detailed diagrams, troubleshooting tips, and a thorough understanding of potential problems are included.
Understanding the Quicksilver Throttle Control Wire
Ever wondered what’s making your Quicksilver boat’s throttle unresponsive? It could be the seemingly simple, yet crucial, throttle control wire. This wire, often overlooked, plays a vital role in transmitting your commands from the helm to the engine. Understanding its components, potential pitfalls, and common causes of failure can save you time and frustration when diagnosing and resolving issues.
Quicksilver Throttle Control Wire Components and Function
A Quicksilver throttle control wire, like most, typically consists of a strong, flexible cable (often steel or a similar material) encased in a protective sheath. This sheath protects the cable from damage and environmental factors. Crucially, it’s connected to the throttle lever on the helm and to the throttle mechanism on the engine. The wire’s function is to translate the rotational movement of the throttle lever into a corresponding adjustment of the engine’s throttle plate, thereby controlling the engine’s speed.
Types of Quicksilver Throttle Control Wires
Quicksilver, like other marine manufacturers, produces throttle control wires in various configurations. Variations often include different lengths, ensuring proper reach between the helm and engine. Material composition might also vary slightly depending on the specific application and environmental conditions. The choice of material and length is critical to maintaining the wire’s integrity and responsiveness over time.
Potential Failure Points
Throttle control wires, despite their robustness, are susceptible to wear and tear. Common failure points include the cable itself, the connectors, and the protective sheath. Corrosion, especially in marine environments, can weaken the cable and reduce its effectiveness. Repeated flexing and bending, especially over extended periods, can lead to cable fatigue and breakage. Damage from sharp objects or rough handling can also compromise the wire’s structural integrity.
Proper maintenance and regular inspections are crucial to mitigate these risks.
Common Causes of Throttle Control Wire Issues
| Issue | Potential Causes |
|---|---|
| Loss of Throttle Response |
|
| Sticking or Jerky Throttle |
|
| Complete Throttle Failure |
|
Identifying the Problem
Figuring out why your Quicksilver throttle isn’t working smoothly starts with recognizing the symptoms. A faulty throttle control wire can manifest in various ways, impacting your boat’s performance and potentially leading to frustrating delays. Understanding these signs can help you pinpoint the problem quickly and efficiently, saving you time and money.Identifying the source of the issue is crucial for effective troubleshooting.
A systematic approach to diagnosing the problem, coupled with a clear understanding of the symptoms, allows you to pinpoint the exact cause of the malfunction and implement the right solution. This section details how to recognize the telltale signs of a bad throttle control wire, enabling you to address the issue promptly.
Signs of a Faulty Throttle Control Wire
Understanding the different symptoms of a faulty throttle control wire is vital for accurate diagnosis. The symptoms can range from subtle issues to more noticeable problems, often providing clues about the underlying cause.
- Irregular Throttle Response: The throttle might not respond consistently to input, resulting in jerky or unpredictable acceleration and deceleration. This could indicate a problem with the wire’s ability to transmit signals accurately.
- Partial Throttle Response: The throttle might only partially respond to input, causing the engine to accelerate or decelerate slowly or inconsistently. This symptom often suggests a resistance or a break in the wire’s connection.
- No Throttle Response: In severe cases, the throttle might fail to respond at all, preventing any acceleration or deceleration. This could indicate a complete disconnect or a significant issue with the wire’s integrity.
- Sticking Throttle: The throttle might get stuck in one position, either open or closed. This could be a sign of a mechanical problem in the throttle assembly, but a faulty wire can sometimes lead to this as well. The wire could be binding or pinching against something, causing the throttle to get stuck.
- Wobbly or Loose Throttle: The throttle might feel wobbly or loose when moved, suggesting a potential problem with the wire’s attachment points or connections. A loose connection can cause the throttle to move inconsistently.
- Wiring Issues: Inspect the throttle control wire for any visible damage such as kinks, cuts, or fraying. These are obvious indicators of a problem and might lead to an immediate response.
Comparing Symptoms and Potential Causes
A systematic comparison of symptoms can aid in isolating the source of the problem. Consider the following correlations:
| Symptom | Potential Cause | Explanation |
|---|---|---|
| Irregular Throttle Response | Faulty Throttle Control Wire | The wire might be damaged or corroded, impacting signal transmission. |
| Partial Throttle Response | Faulty Throttle Control Wire | The wire might have a resistance, break or a connection issue, leading to a partial signal transmission. |
| No Throttle Response | Faulty Throttle Control Wire | A complete break in the wire or a significant issue with the connections could prevent the throttle from responding. |
| Sticking Throttle | Faulty Throttle Control Wire, Throttle Assembly Issues | A binding wire can sometimes lead to the throttle getting stuck. Other mechanical problems within the throttle assembly could also be the cause. |
| Wobbly or Loose Throttle | Loose Connections, Damaged Wire | Loose connections or damaged wire can affect the throttle’s smooth operation. |
| Wiring Issues (Visible Damage) | Damaged Throttle Control Wire | Physical damage to the wire is an immediate indicator of a problem. |
Diagnostic Checklist for Throttle Control Wire Problems
A systematic checklist can streamline the diagnosis process.
- Visual Inspection: Carefully examine the throttle control wire for any visible damage (cuts, kinks, fraying, or corrosion). This initial check can often reveal the cause.
- Throttle Response Testing: Gradually move the throttle through its full range of motion. Note any irregularities, sticking points, or inconsistent responses. Record your observations for future analysis.
- Connection Check: Verify all connections along the wire route, ensuring they are secure and free from any obstructions or binding. This involves checking for loose connections, corrosion, or pinched wires.
- Engine Operation Assessment: Observe the engine’s performance while adjusting the throttle. Note any discrepancies or abnormal behavior, and correlate it with the observations during the throttle response testing.
- Comparison with a Known Good Unit: If possible, compare the operation of the suspected wire with a known-good wire. This can confirm if the problem lies with the wire itself.
Tools and Materials Required
Replacing a Quicksilver throttle control wire is a straightforward process, but having the right tools and materials is crucial for a smooth and safe repair. A well-equipped toolkit will not only ensure the job gets done correctly but also minimize the risk of damaging the engine or yourself. The following sections detail the essential tools and parts needed for this task.
Required Tools
A comprehensive set of tools is necessary for safely and effectively removing and installing the throttle control wire. These tools will ensure precision and prevent damage during the process. Improper tools can lead to irreversible damage.
- Wire Cutters/Crimpers: Essential for precisely cutting the old wire and creating secure connections with the new wire. Look for cutters with a built-in crimp function to ensure proper wire termination.
- Screwdrivers (Phillips and Flathead): These are vital for disassembling various components, depending on the specific Quicksilver model. Ensure the screwdrivers are in good condition to prevent stripping screws.
- Pliers (Needle Nose and Regular): Needle-nose pliers are helpful for maneuvering small parts and gripping wires. Regular pliers are useful for general handling.
- Torque Wrench (Optional but Recommended): A torque wrench ensures that bolts and screws are tightened to the manufacturer’s specifications, preventing damage to the engine or components. This is especially important when working on engine parts.
- Wire Strippers: These are essential for removing the insulation from the new wire to ensure proper connection.
- Measuring Tape/Ruler: Accurate measurement is essential for ensuring the new throttle cable is the correct length. This is critical for proper function.
- Gloves: Protect your hands from cuts and potential hazards.
- Safety Glasses/Goggles: Protect your eyes from debris or accidental splashes during the repair process.
Safety Precautions
Safety should always be the top priority when working on any mechanical system, especially an engine. Following these precautions will minimize potential risks.
- Disconnect the Battery: Before starting any work on the engine, disconnect the negative terminal of the battery. This prevents accidental electrical shocks.
- Secure the Work Area: Ensure the work area is well-lit and stable. Avoid working on uneven surfaces.
- Proper Ventilation: If working in a confined space, ensure adequate ventilation to avoid exposure to harmful fumes.
- Consult the Owner’s Manual: Always refer to the owner’s manual for specific instructions on disassembling and reassembling the throttle control system.
- Wear appropriate personal protective equipment (PPE): This includes safety glasses, gloves, and potentially a dust mask, depending on the specifics of the repair.
Replacement Parts
Ensure you have the correct replacement parts to avoid further issues or complications.
- Throttle Control Wire: The most important part is the new throttle cable, ensuring it is compatible with your specific Quicksilver model.
- Wire Connectors/Terminals: Ensure you have the correct wire connectors for the new throttle wire.
- Additional Parts: Depending on the specific model and repair needed, other parts may need replacement. Consult the owner’s manual to identify all necessary components.
Step-by-Step Removal Procedure

Removing your Quicksilver throttle control wire isn’t rocket science, but a methodical approach ensures a clean and safe process. Following these steps will help you disconnect the wire without damaging it or any connected components. This guide provides a detailed, step-by-step process to safely remove the wire, saving you time and frustration.
Preparation for Removal
Before you begin, gather your tools and materials. Having everything readily available will streamline the process and prevent delays. Ensure you have a well-lit workspace and are comfortable working on the engine.
Disconnecting the Throttle Cable
Careful disconnection is crucial to avoid damaging the throttle cable or any related components. Incorrect procedures can lead to malfunctions and potentially costly repairs. The steps below detail the proper disconnection process.
- Locate the Throttle Cable Connection Point: Identify the precise connection point between the throttle cable and the throttle body or control unit. This point is usually easily identifiable, often with a specific connector or clamp.
- Secure the Throttle Cable: Using a suitable tool (e.g., pliers, a wrench), gently secure the throttle cable housing or the connector to prevent accidental movement during the disconnect process. This precaution is essential to avoid damaging the cable or surrounding parts.
- Release the Clamps or Connectors: Carefully release any clamps or connectors holding the throttle cable in place. Use the appropriate tools, and ensure you’re not applying excessive force. If the connection is stubborn, consult your Quicksilver owner’s manual for specific instructions.
- Withdraw the Throttle Cable: Gently pull the throttle cable away from its connection point, ensuring that you are not yanking or twisting it. If the cable seems to be caught or stuck, inspect the connection area for any obstructions or interference.
Inspecting the Throttle Cable
A thorough inspection of the throttle cable after disconnection ensures that it’s in good condition and helps you pinpoint any potential issues before reinstallation.
- Visual Inspection: Examine the throttle cable for any visible damage, such as kinks, cracks, or fraying. Note any abnormalities.
- Functionality Check (Optional): If possible, test the cable’s functionality before removing it completely. This helps you identify any problems that might be masked by the wire being connected.
Table of Step-by-Step Removal Process with Images
| Step | Description | Image |
|---|---|---|
| 1 | Locate the Throttle Cable Connection Point | (Image: A clear picture of the throttle cable connection point, highlighting the relevant components.) |
| 2 | Secure the Throttle Cable | (Image: A picture showing the cable secured with the appropriate tool. Indicate the specific tool used.) |
| 3 | Release the Clamps or Connectors | (Image: A picture demonstrating the process of releasing the clamps or connectors, showcasing the correct technique.) |
| 4 | Withdraw the Throttle Cable | (Image: A picture showing the throttle cable being carefully withdrawn from its connection point. Indicate the direction of pull.) |
Troubleshooting and Common Issues
Removing a Quicksilver throttle control wire can seem straightforward, but potential issues can arise. Understanding these common problems and their solutions will save you time and frustration, ensuring a smooth repair process. Knowing what to look for and how to address these issues can prevent costly mistakes and ensure a proper repair.
Common Removal Obstacles
Several factors can complicate the removal process. A corroded or damaged wire, a seized throttle cable, or a jammed cable end can all cause problems. Thorough inspection and methodical troubleshooting are key to identifying the specific issue.
Identifying a Corroded Wire
Corrosion on the throttle control wire can make it difficult to disconnect or remove. Visual inspection is crucial. Look for signs of rust, pitting, or discoloration. This often manifests as a hardened or brittle coating on the wire. If corrosion is severe, the wire might be brittle and snap during removal.
Consider using wire strippers with insulated handles to avoid contact with the corroded metal.
Dealing with a Seized Throttle Cable
A seized throttle cable can impede removal. The cable may be stuck in the housing or jammed in a particular position. Try lubricating the cable housing with a penetrating oil. Work the cable gently back and forth while applying pressure. If the cable is excessively seized, you might need to use pliers or a specialized tool to free the cable end.
Addressing a Jammed Cable End
A jammed cable end is another common problem. The end of the cable might be caught or bent, preventing disconnection. Carefully inspect the cable end for any obstructions. Try to gently manipulate the cable end, straightening any bends or freeing it from any obstructions. If the issue persists, consider using a cable end removal tool or a small, flat-head screwdriver to gently dislodge the cable end.
Troubleshooting Table
| Problem | Solution |
|---|---|
| Corroded wire | Inspect for rust, pitting, or discoloration. Use wire strippers with insulated handles. |
| Seized throttle cable | Lubricate the cable housing with penetrating oil. Work the cable back and forth while applying pressure. |
| Jammed cable end | Inspect for obstructions. Gently manipulate the cable end. Consider using a cable end removal tool or a small, flat-head screwdriver. |
Identifying and Resolving Specific Issues
When encountering a specific issue, a methodical approach is vital. Start by carefully inspecting the wire and cable for any visible signs of damage. If corrosion is present, address it before proceeding with the removal. If the cable is seized, apply penetrating oil and try to manipulate the cable gently. If the cable end is jammed, try to dislodge it using a tool, but be cautious not to damage the cable.
If the problem persists, consult a qualified mechanic for assistance.
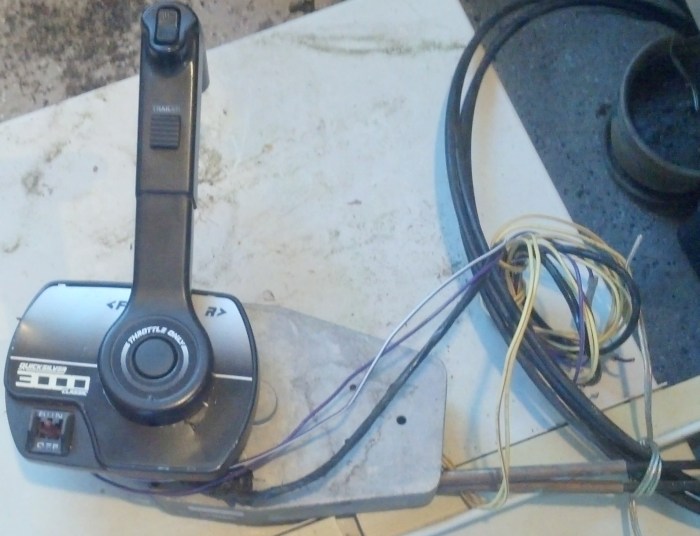
Diagram of the Quicksilver Throttle Control Wire
Understanding the intricate workings of your Quicksilver throttle control wire is crucial for effective troubleshooting and maintenance. This wire, often the source of frustrating issues, plays a vital role in translating your input to the engine’s power output. A clear understanding of its components and connections empowers you to diagnose problems accurately and repair them efficiently.
Throttle Control Wire Components
The Quicksilver throttle control wire, a critical component in your boat’s engine system, is a complex assembly of interconnected parts. Proper identification and understanding of these components is key to successful troubleshooting. The wire’s construction ensures smooth and reliable power delivery. 

Note: This is a generic diagram and may vary slightly depending on the specific Quicksilver model.
- Throttle Cable: The primary component, responsible for transmitting the throttle position from the steering wheel or control lever to the engine. It often features a series of bends, allowing for precise control.
- Throttle Position Sensor (TPS): A crucial component that monitors the position of the throttle and sends signals to the engine’s control unit. This allows the engine to adjust fuel and air intake accordingly. Failure of the TPS can lead to erratic engine performance.
- Control Arm/Lever: The physical connection point on the engine side of the wire, often connected to a linkage system. This mechanism ensures the precise translation of the throttle movement. A damaged control arm can cause erratic throttle response.
- Cable Housing/Sheathing: The protective covering surrounding the throttle cable. This protects the cable from damage and ensures smooth operation. A worn or damaged housing can lead to friction and signal interference.
- Connectors/Terminals: These are the points where the throttle cable connects to the steering wheel or control lever and to the engine components. Proper connection is critical for effective signal transmission. Faulty connectors can cause intermittent throttle response.
Connection Points Table
Accurate identification of connection points is essential for troubleshooting and replacement. The following table details the connection points for a typical Quicksilver throttle control wire.
| Component | Connection Point |
|---|---|
| Steering Wheel/Control Lever | Throttle Cable Input |
| Throttle Position Sensor (TPS) | Signal Transmission Point |
| Engine Control Unit | Signal Receiving Point |
Physical Dimensions
Understanding the physical dimensions of the Quicksilver throttle control wire is important for accurate replacement. These dimensions can vary depending on the specific engine model and application. The following information provides a general guideline:
- Length: The cable length can vary from 3 feet to 10 feet, depending on the application. Accurate measurement is vital for proper installation.
- Diameter: The cable diameter is typically between 1/8 inch and 3/16 inch. Using the incorrect diameter can affect the cable’s ability to function properly.
- Material: The material of the throttle cable is typically a durable, corrosion-resistant steel alloy. This helps ensure longevity and performance.
Replacing the Quicksilver Throttle Control Wire: How To Remove Quicksilver Throttle Control Wire Diagame
Replacing a Quicksilver throttle control wire is a relatively straightforward process, but precision and care are crucial to ensure proper functionality and avoid further issues. This step-by-step guide provides a comprehensive approach, covering installation techniques and potential pitfalls. Following these instructions will help you get your boat’s throttle system working smoothly again.
Preparation for Replacement
Before starting the replacement process, gather all necessary tools and materials. Ensure you have a clear workspace and adequate lighting. A clean and organized environment will greatly aid in the process and help you avoid mistakes. Proper preparation minimizes the risk of errors and ensures a smoother installation.
Disconnecting the Old Wire
Carefully disconnect the old throttle control wire from the throttle housing and any other connected components. Refer to the diagram provided earlier for the precise locations of connections. Note the original wire’s routing for accurate reinstallation. Properly disconnecting the old wire is crucial to prevent damage to the housing or other parts.
Removing the Old Wire
Once the old wire is disconnected, carefully remove it from its existing mounting points. Pay attention to any clips or fasteners securing the wire. Properly removing the old wire is important for preventing damage to the wire or other parts of the throttle system. Take care to avoid pulling on the wire too forcefully, as this could damage the wire itself.
Installing the New Wire
The installation of the new wire follows a reverse procedure. First, meticulously route the new wire through the same path as the old wire, ensuring it is not pinched or kinked. Carefully connect the new wire to the throttle housing and any other connected components, ensuring a secure and tight connection. Pay attention to the correct polarity if applicable.
Securing the New Wire
Once all connections are made, secure the new wire using the same clips or fasteners used with the old wire. Ensure that the wire is properly supported and won’t become pinched or damaged during operation. Tightening all fasteners securely prevents future issues and ensures the wire is not subject to stress or movement.
Testing the New Wire
After installing the new wire, test the throttle response to verify proper functionality. Gradually operate the throttle to confirm smooth and consistent response. Ensure the throttle operates smoothly throughout the entire range. A thorough test is essential to guarantee the new wire is functioning correctly.
Comparison of Old and New Wires
| Feature | Old Throttle Control Wire | New Throttle Control Wire |
|---|---|---|
| Material | Original material (e.g., copper, steel) | New, compatible material (e.g., same as original) |
| Length | Original length | Matching length for proper functionality |
| Condition | May show wear, damage, or corrosion | New, undamaged condition |
| Functionality | May be exhibiting issues, such as sticking or inconsistent response | Expected to operate smoothly and reliably |
Testing and Verification
Replacing a Quicksilver throttle control wire is a straightforward process, but proper testing ensures a successful repair. Thorough verification confirms the new wire functions as expected, restoring optimal engine performance and preventing future issues. This section details the crucial steps for testing and verifying the replaced throttle control wire, ultimately ensuring a smooth and efficient repair.The testing process involves verifying the wire’s functionality under various conditions to guarantee accurate throttle response.
This detailed procedure provides a comprehensive understanding of the testing procedure and expected results. Correct testing is essential to avoid potential problems stemming from an incorrectly installed or functioning throttle control wire.
Testing the Replaced Wire
Properly testing the replaced wire is crucial to ensure a successful repair. This process confirms that the new wire accurately transmits signals from the throttle to the engine’s control system, leading to the correct engine speed.
- Initial Power-On Check: Turn the ignition key to the “on” position without starting the engine. Check for any visual or audible indications of a problem in the throttle control system. This initial check quickly identifies potential electrical issues.
- Throttle Position Verification: Slowly move the throttle lever through its full range. The throttle position sensor should accurately reflect these changes, providing feedback to the engine control unit (ECU). Observe the sensor readings or use a diagnostic tool to confirm this accuracy. Discrepancies between the physical throttle position and the sensor reading may indicate a wiring issue.
- Engine Response Verification: Start the engine and gently operate the throttle. Note the engine’s response to throttle input. A smooth and responsive acceleration and deceleration are expected results. Any hesitation, jerky movements, or lack of response should be investigated further. A quick, responsive acceleration suggests the new wire is properly functioning.
- Idle Speed Verification: Allow the engine to reach its idle speed. The idle speed should be stable and within the manufacturer’s specifications. An unstable idle speed might indicate a faulty connection or improper adjustment in the throttle control system. A stable idle speed is an indicator of a properly working wire.
Verification Checks, How to remove quicksilver throttle control wire diagame
This list details crucial checks to ensure the repair’s success, covering various aspects of the throttle control system.
- Visual Inspection: Carefully examine the entire length of the replaced wire for any signs of damage, such as kinks, cuts, or fraying. This thorough visual inspection ensures the wire is intact and suitable for use.
- Connection Integrity: Inspect all connections for tightness and proper alignment. Ensure all connectors are securely fastened to prevent any signal interruptions. Loose or damaged connections may lead to erratic throttle responses. All connections must be secure to avoid problems later.
- Sensor Readings: Use a diagnostic tool or appropriate equipment to monitor the sensor readings during the testing procedures. These readings confirm that the throttle position sensor is accurately communicating with the ECU. Consistent sensor readings confirm proper wire functionality.
Expected Results Table
This table Artikels the expected results of the testing procedure, providing a clear guideline for evaluating the repair’s success.
| Test Step | Expected Result | Troubleshooting Action (if result is not as expected) |
|---|---|---|
| Initial Power-On Check | No visual or audible anomalies | Check for loose connections, damaged wires, or electrical issues. |
| Throttle Position Verification | Accurate sensor readings reflecting throttle position changes | Inspect connections, ensure proper sensor calibration, and verify wire integrity. |
| Engine Response Verification | Smooth and responsive acceleration and deceleration | Check for loose connections, damaged wires, or ECU issues. |
| Idle Speed Verification | Stable idle speed within manufacturer’s specifications | Adjust idle speed settings, check for air leaks, and ensure the wire is functioning correctly. |
Maintenance and Prevention


Keeping your Quicksilver throttle control wire in top shape is crucial for reliable performance and avoiding costly repairs. Regular maintenance, focusing on lubrication and tension, can significantly extend the life of this vital component, preventing potential issues down the road. Proactive care pays off in the long run, saving you time and money.
Essential Maintenance Practices
Proper maintenance involves a combination of regular inspections and proactive preventative measures. This approach ensures optimal wire function and reduces the risk of premature wear or failure.
Regular Inspections
Regular inspections are vital for early detection of potential problems. Visual inspections should be performed at least monthly, checking for any signs of damage, such as frayed or broken wires, corrosion, or kinks. Look for any unusual wear or stretching of the wire housing. Pay close attention to the area where the wire connects to the throttle lever and the engine.
Note any signs of friction or binding.
Lubrication Techniques
Lubrication is key to preventing friction and ensuring smooth operation. Use a high-quality, marine-grade lubricant specifically designed for throttle cables. Apply lubricant sparingly along the entire length of the wire, focusing on areas prone to friction, such as bends and curves. Avoid over-lubrication, as excess lubricant can attract dirt and grime. Proper lubrication maintains consistent and efficient throttle response.
Maintaining Wire Tension
Maintaining the correct tension in the throttle control wire is crucial. The wire should not be overly tight or loose. Overly tight wires can cause premature wear and tear, while loose wires can lead to inconsistent throttle response. Consult your Quicksilver owner’s manual for the correct tension specifications. A calibrated tensioner tool is beneficial to ensure accurate adjustments.
Maintenance Checklist
Regular maintenance of your Quicksilver throttle control wire can be streamlined with a checklist. This ensures that all essential steps are followed consistently.
- Visual Inspection (Monthly): Check for damage, corrosion, or unusual wear. Note any binding or friction points.
- Lubrication (Quarterly): Apply a marine-grade lubricant to the wire, focusing on areas of friction. Avoid over-lubrication.
- Tension Adjustment (Annually): Verify wire tension using the proper tools and specifications in the owner’s manual. Adjust if necessary.
- Cable Connections (Every 200 Hours): Inspect the connections between the throttle lever and the engine for any signs of wear, corrosion, or damage.
Following this checklist will help maintain optimal performance and prevent future issues.
End of Discussion
In conclusion, removing a Quicksilver throttle control wire requires meticulous attention to detail. This guide, by providing a step-by-step procedure, ensures a smooth and safe removal. Remember safety precautions and the proper use of tools are crucial. Thorough understanding of the process and proper maintenance will ensure long-term reliability. By following the steps Artikeld, you can confidently tackle this task and restore optimal performance to your vessel.
Detailed FAQs
What are the common symptoms of a faulty Quicksilver throttle control wire?
Symptoms may include erratic throttle response, sticking throttle, no throttle response, and unusual noises. A visual inspection for frayed wires or damaged connectors is also important.
What specific tools are needed for the removal process?
A variety of tools may be required, including pliers, screwdrivers, wrenches, and potentially a wire cutter. Specific tools depend on the boat model and throttle control wire type.
What safety precautions should be taken during the removal process?
Always disconnect the battery before working on any electrical components. Wear appropriate safety glasses and gloves to protect yourself from potential hazards.
How can I prevent future throttle control wire issues?
Regular inspections, proper lubrication, and keeping the wire free from obstructions can help prevent future issues. Proper storage and handling also contribute to long-term performance.