

How to remove alternator pulley effectively and safely is crucial for any automotive enthusiast or mechanic. This guide dives deep into the process, providing a step-by-step approach to ensure a successful outcome. Understanding the alternator’s role in your vehicle’s electrical system and the different pulley types is vital for proper removal and reinstallation. We’ll equip you with the necessary tools, vehicle preparation steps, and troubleshooting techniques to handle any challenges that may arise.
Mastering this process will not only save you time and money but also enhance your confidence in working on your vehicle.
The alternator pulley, a critical component of your vehicle’s electrical system, transfers power from the engine to the alternator. Its proper removal is essential for maintenance, repairs, and upgrades. This comprehensive guide will detail the steps required for a safe and efficient removal process, including detailed explanations and visuals to help you understand each stage. We will cover specific tools, vehicle preparation, the removal process itself, troubleshooting, and the vital reinstallation procedure.
This knowledge will enable you to tackle this task confidently and efficiently.
Introduction to Alternator Pulley Removal
The alternator pulley plays a critical role in a vehicle’s electrical system. It’s a key component in the belt-driven mechanism that powers the alternator, responsible for charging the battery and supplying electrical power to various components throughout the vehicle. Understanding its function is essential for safe and effective maintenance.Proper alternator pulley removal and installation is crucial for maintaining the vehicle’s electrical system.
Incorrect procedures can lead to damage to the pulley, the alternator, or other components, and potentially compromise the vehicle’s electrical performance. This could manifest in battery drain, malfunctioning electrical accessories, or even complete electrical system failure. Moreover, improper removal can result in damage to the crankshaft or other engine components. It is vital to follow correct procedures and utilize appropriate tools to avoid these negative consequences.
Alternator Pulley Types and Applications
Alternator pulleys come in various designs, each tailored to specific engine configurations and alternator models. Understanding the type of pulley is essential for selecting the right tools and procedures for removal. Some common types include:
- Standard Pulleys: These are the most common type and are typically found on older vehicles. They often have a simple, smooth design for easy belt engagement. They require careful handling during removal to prevent damage.
- Grooved Pulleys: These pulleys have grooves or channels to accommodate the belt, enhancing belt tension and preventing slippage. They may require specific tools for their removal, and special attention to the alignment of the belt in the grooves.
- Serpentine Belt Pulleys: Used in vehicles with serpentine belt systems, these pulleys often have a complex arrangement of grooves and attachments. Carefully identify all components of the pulley system to ensure the belt remains properly aligned and tensioned.
Removal Tool Considerations
Selecting the appropriate tools for alternator pulley removal is vital for a successful and safe job. The type of pulley will determine the tools needed.
| Pulley Type | Common Tools | Notes |
|---|---|---|
| Standard Pulleys | Socket wrenches, adjustable wrenches, impact wrench (if applicable), and a puller (if needed). | Ensure sockets are the correct size to avoid damaging the pulley or the bolts. |
| Grooved Pulleys | Socket wrenches, adjustable wrenches, puller specifically designed for grooved pulleys, and potentially a drift or alignment tool for the belt. | Proper pulley identification is crucial for selecting the correct puller. |
| Serpentine Belt Pulleys | Combination of tools, including serpentine belt tensioner tools, various socket wrenches, and sometimes specialized pullers for specific pulley components. | Due to the complexity of serpentine belt systems, refer to the vehicle’s repair manual for detailed procedures. |
Tools and Materials Required

Getting the right tools and materials is crucial for a safe and successful alternator pulley removal. Proper preparation minimizes the risk of damage to your vehicle and ensures the job is done correctly. Having the necessary tools on hand, and knowing how to use them safely, is paramount to a smooth and efficient process.
Essential Tools
Proper tool selection is essential to prevent damage to the alternator and other components. Using the incorrect tool can lead to stripping bolts, damaging threads, or causing unnecessary stress on parts. This section Artikels the critical tools required for alternator pulley removal, emphasizing the importance of choosing the right tools for the job.
- Socket Set: A comprehensive socket set with various sizes is vital for removing and securing bolts and nuts. Having the correct size sockets prevents damage to the fasteners and ensures proper torque during reassembly. A 1/2-inch drive socket set is commonly used for most vehicles. Always confirm the sizes of the fasteners in your specific vehicle manual.
- Torque Wrench: A torque wrench is indispensable for applying the precise amount of tightening force required for bolts and nuts. Incorrect torque can lead to stripped bolts or components failing prematurely. A torque wrench ensures proper tension and prevents damage to the vehicle’s components during reassembly.
- Ratchet Set: A selection of ratchets, with various extensions and adaptors, is needed for reaching fasteners in tight spaces. Using the correct ratchet and extensions avoids straining your back and improves access to hard-to-reach bolts. Using an appropriate ratchet for the task at hand is vital for efficiency and safety.
- Pliers: Needle-nose pliers, slip-joint pliers, and channel-lock pliers are essential for handling small parts, securing components, and assisting with various tasks. These tools provide necessary gripping and manipulating capabilities during the procedure.
- Wrench Set: Wrench sets, including adjustable wrenches and open-end wrenches, are important for specific fasteners and components. The specific types and sizes required vary depending on the vehicle make and model. Using the correct wrench set ensures proper handling of the fasteners without causing damage.
Vehicle-Specific Tools
Certain vehicle makes and models might require specialized tools. Consult your vehicle’s repair manual for any specific tools needed. It is essential to know which tools are required for your specific vehicle model. This can save time and ensure the job is completed correctly.
- Alternator Removal Tool: Some vehicles have unique alternator removal tools that are designed to safely and efficiently remove the alternator. Using a specialized tool will provide the necessary leverage and protection during the procedure. These tools minimize the risk of damage to the alternator.
- Puller Sets: In some instances, a pulley puller set might be required. These sets are designed to remove stubborn pulleys, without damaging the component. Using a puller set ensures the pulley is removed safely without causing damage.
Safety Precautions
Safety is paramount during any automotive repair. Using appropriate safety gear, including eye protection and gloves, is vital. Handling tools and parts with care and following the safety instructions in the vehicle manual can significantly reduce the risk of accidents. Understanding how to handle tools safely is vital to prevent injuries.
| Tool | Purpose | Notes |
|---|---|---|
| Socket Set | Removing and securing bolts/nuts | Ensure correct size for specific fasteners. |
| Torque Wrench | Applying precise tightening force | Critical for avoiding stripped bolts and damage. |
| Ratchet Set | Reaching fasteners in tight spaces | Choose appropriate size and extensions. |
| Pliers | Handling small parts, securing components | Use appropriate type for specific tasks. |
| Wrench Set | Specific fasteners/components | Ensure correct wrench type and size. |
Vehicle Preparation: How To Remove Alternator Pulley
Preparing your vehicle correctly is crucial for a safe and successful alternator pulley removal. Proper preparation minimizes risks and ensures the procedure is performed smoothly and efficiently. This section details the steps involved in readying your vehicle for this task.Vehicle preparation involves several key steps, including securing the vehicle, disconnecting the battery, and taking necessary safety precautions. These measures prevent accidents and ensure the safety of the technician and bystanders.
Following these steps carefully will significantly reduce the chance of injury and damage to the vehicle.
Securing the Vehicle
Properly securing the vehicle is essential to prevent any accidental movement during the pulley removal process. This step is vital to ensure the safety of everyone working on the vehicle and to prevent damage to the vehicle itself.
- Park the vehicle on a level surface, preferably on a firm, stable area. Use wheel chocks or blocks to prevent any unintentional movement.
- Engage the parking brake firmly. This additional precaution prevents the vehicle from rolling unexpectedly.
- Consider using safety stands to support the vehicle if possible. This will provide extra stability and support for the work area.
Disconnecting the Battery
Disconnecting the vehicle’s battery is a critical safety measure. It prevents electrical hazards and accidental short circuits. This precaution is paramount to prevent any electrical shocks or damage to the vehicle’s electrical system.
- Locate the battery terminals and disconnect the negative (-) terminal first. This prevents any electrical sparks or surges that could cause damage or injury.
- Once the negative terminal is disconnected, disconnect the positive (+) terminal. This ensures complete disconnection of the electrical system.
- Allow sufficient time for the electrical system to fully discharge before proceeding with any further work. This reduces the risk of electrical hazards and prevents accidental starts.
Safety Precautions
Adhering to safety precautions during vehicle preparation is paramount. This section details important safety measures to take before commencing the pulley removal process.
- Wear appropriate safety gear, including safety glasses and gloves. These precautions prevent injuries caused by flying debris or sharp objects.
- Ensure the work area is well-lit and clear of obstructions. This improves visibility and prevents accidents during the process.
- Inform others in the vicinity of the work area about the upcoming procedure and the safety measures in place. This proactive measure ensures everyone is aware of the safety precautions being taken.
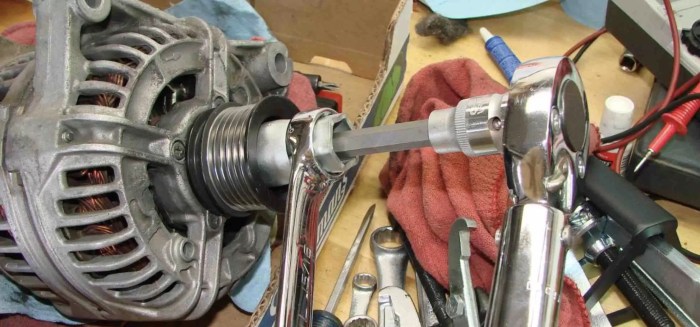
Removing the Alternator Pulley


Carefully removing the alternator pulley is crucial for various automotive repairs, from alternator replacement to belt tensioner adjustments. Proper technique prevents damage to the pulley, the alternator, and surrounding components. This section details the step-by-step procedure, highlighting potential challenges and best practices for different vehicle models.
Procedure for Removing the Alternator Pulley
A systematic approach is essential to ensure a smooth and safe pulley removal process. This involves identifying the specific components and tools needed, preparing the vehicle, and executing the steps in the correct order. Understanding the potential challenges and employing the appropriate techniques is paramount to avoid damaging the pulley or surrounding parts.
Specific Steps for Different Vehicle Models, How to remove alternator pulley
Different vehicle models may have slightly varying configurations for alternator pulley removal. Factors such as engine type, pulley design, and accessory belt routing influence the precise steps. Consulting the vehicle’s repair manual is highly recommended for accurate procedures tailored to the specific model.
Importance of Correct Techniques
Using the right techniques is vital to prevent damage during pulley removal. Incorrect methods can lead to warped or damaged pulleys, causing premature failure and requiring costly replacements. A methodical approach, using appropriate tools, and following the prescribed steps minimizes the risk of such problems.
Potential Challenges During Removal
Several challenges might arise during alternator pulley removal. These include a stubborn pulley, a seized pulley bolt, or issues with the accessory belt. Proper planning, using the correct tools, and applying appropriate force are key to overcoming these potential difficulties.
Step-by-Step Procedure Table
| Step | Action | Tools/Materials |
|---|---|---|
| 1 | Disconnect the negative battery terminal. | Socket wrench, ratchet, extension |
| 2 | Locate and identify the alternator pulley bolt. | Visual inspection |
| 3 | Prepare the necessary tools, including a suitable wrench or socket set. | Wrench, socket, extension, impact wrench (if needed), safety glasses |
| 4 | Loosen the pulley bolt, applying gentle pressure. | Appropriate wrench size, care to avoid damage to the bolt |
| 5 | If the pulley is stubborn, apply penetrating oil to the bolt threads. | Penetrating oil |
| 6 | If the bolt is seized, use an impact wrench with caution. | Impact wrench, torque wrench |
| 7 | Once loosened, remove the pulley bolt completely. | Socket wrench, ratchet, extension |
| 8 | Carefully remove the pulley using the appropriate tools. | Appropriate tools (depending on the type of pulley), safety precautions |
| 9 | Inspect the pulley for damage. | Visual inspection |
| 10 | Clean the area around the alternator. | Cleaning supplies |
Troubleshooting Common Issues
Successfully removing an alternator pulley often hinges on anticipating potential problems and having a strategy for dealing with them. This section details common issues encountered during the removal process, their causes, and effective solutions. Understanding these potential pitfalls will help you proceed with confidence and minimize the risk of damage to your vehicle’s components.
Common Problems and Solutions
Several issues can arise during alternator pulley removal. These problems often stem from neglecting proper preparation, using inadequate tools, or applying excessive force. Addressing these issues promptly can prevent further complications and ensure a smooth removal process.
| Issue | Cause | Solution |
|---|---|---|
| Pulley Sticking Tightly | Rust, corrosion, or seized components within the pulley assembly, inadequate lubrication, or improper use of tools. | Ensure the pulley is thoroughly lubricated with penetrating oil or WD-40. Apply the lubricant liberally and allow it to sit for at least 15 minutes before attempting to remove the pulley. If the pulley still resists, try using a pulley removal tool specifically designed for your vehicle’s make and model. If the issue persists, consider a mechanic for assistance. |
| Damage to the Alternator or Pulley Housing | Excessively forceful removal methods, using the wrong tools, or a damaged pulley to begin with. | Employ appropriate tools designed for the job and avoid using excessive force. If the pulley is damaged, consider replacing it immediately to prevent further issues. If the alternator housing is damaged, seek professional assistance to prevent any additional damage to the alternator or the vehicle’s electrical system. |
| Damage to the Belt | Over-tightening or improper handling of the serpentine belt during pulley removal. | Carefully handle the serpentine belt during the entire process. Ensure the belt tension is appropriately adjusted after the pulley removal. If the belt is damaged, replace it with a new one. Always ensure that the new belt is compatible with the vehicle’s specifications. |
| Difficulty Removing the Pulley Bolt | Corrosion, seizing, or the use of a stripped or damaged bolt. | Apply penetrating oil to the pulley bolt and allow it to soak for a while. If the bolt is stripped, use a bolt extractor tool or seek professional assistance. If the bolt is damaged, ensure that a replacement bolt is of the same size and material specification. |
| Alternator Bearing Noise | Incorrect removal techniques that stress or damage the alternator bearings. | Ensure the pulley removal process is performed methodically and with precision. If any grinding or unusual noises are heard during the removal process, stop immediately and assess the source of the problem. |
Potential Damage to Components
Careless or improper removal methods can lead to damage to the alternator, the pulley itself, the surrounding components, and even the vehicle’s electrical system. Damaged components may necessitate costly repairs or replacements. It is crucial to prioritize precision and safety throughout the entire removal process. For instance, applying excessive force to the pulley can cause it to crack, warp, or become damaged beyond repair.
This can lead to problems with alternator function, and even affect the vehicle’s electrical system.
Importance of Using Appropriate Tools
The selection of the right tools is paramount to a successful and safe pulley removal. Inappropriate tools can lead to damage, hindering the entire process. Using a pulley removal tool specifically designed for your vehicle’s make and model is crucial to avoid damaging the pulley or surrounding components.
Reinstalling the Alternator Pulley
Careful reinstallation of the alternator pulley is crucial for restoring the proper functioning of your vehicle’s electrical system. Incorrect torque or improper alignment can lead to premature wear and tear on components, potentially causing electrical problems and affecting overall performance. This section provides a detailed step-by-step guide to reinstall the pulley correctly, tailored to various vehicle models, while highlighting the importance of precise torque specifications.Proper reinstallation of the alternator pulley ensures the alternator operates efficiently and reliably.
It is essential to follow the specified torque values and procedures to avoid damaging the engine components or the pulley itself. Ignoring these crucial steps can lead to issues with the alternator’s output, impacting the vehicle’s electrical systems.
Reinstallation Procedure
To ensure a safe and successful reinstallation, carefully follow these steps. Failure to adhere to these instructions could result in damage to the vehicle’s components.
- Verify Alignment Marks: Before placing the pulley, meticulously check for alignment marks on both the crankshaft pulley and the alternator pulley. Misalignment can lead to improper functioning. Ensure that these marks are aligned with each other as specified by the vehicle’s manufacturer. If alignment marks are not visible, consult the vehicle’s repair manual.
- Position the Pulley: Carefully position the alternator pulley onto the crankshaft pulley, ensuring that the alignment marks align properly. Verify that the pulley’s grooves align with the crankshaft pulley’s keyway.
- Install the Bolt/Fasteners: Using the correct tools, gently tighten the bolts/fasteners that secure the alternator pulley to the alternator. Ensure the bolts are positioned correctly and are not overtightened.
- Torque Tightening: This is a critical step. Use a torque wrench to tighten the bolts to the exact torque specifications recommended by the vehicle’s manufacturer. Over-tightening can damage components, while under-tightening can lead to loose connections. Consult the vehicle’s repair manual for the precise torque specifications for your vehicle model.
- Verify Alignment (Again): After tightening the bolts, double-check the alignment of the pulley with the crankshaft pulley to confirm proper placement. Any misalignment should be corrected before proceeding.
- Final Check: Carefully inspect the pulley and its mounting bolts for any signs of damage or looseness. Ensure that everything is secure and properly aligned. Tighten any loose bolts.
Torque Specifications Table
The table below provides a general guideline for torque specifications. It is crucial to consult your vehicle’s repair manual for the exact torque specifications for your specific model and year. Variations in engine types and pulley designs can impact these values.
| Step | Action | Torque (Approximate – Consult Manual) |
|---|---|---|
| 1 | Initial tightening of pulley bolts | 20-30 ft-lbs |
| 2 | Final tightening of pulley bolts | 50-70 ft-lbs |
Post-Removal Checks and Final Steps
Taking the time to thoroughly check your work after removing the alternator pulley is crucial. This ensures everything is properly reassembled, minimizing the risk of complications or potential damage to the vehicle. Correctly reconnecting components and performing the final steps guarantees a smooth return to operation.Careful inspection and adherence to the procedures detailed below will help prevent future problems.
Critical Checks After Pulley Removal
Thorough checks are essential to ensure the proper seating and function of the pulley and surrounding components. Neglecting these checks can lead to issues like improper belt tension, lack of alternator function, or even damage to the engine or accessory system. This section details the critical areas to inspect.
- Pulley Seating and Alignment: Verify the pulley is seated correctly on the crankshaft or alternator shaft. Misalignment can cause improper belt tension or prevent the alternator from functioning correctly. Visually confirm that the pulley is centered and snug against the shaft. Use a straight edge or similar tool to check for any visible misalignment.
- Belt Tension and Condition: Inspect the serpentine belt for any damage, wear, or fraying. Ensure the belt is properly tensioned. Excessive tension can damage the belt or pulleys, while insufficient tension can cause slipping or failure to drive the alternator. A proper tension can be checked with a tension gauge or by hand, ensuring the belt doesn’t sag or move freely.
- Alternator Mounting and Connections: Verify that the alternator is securely mounted to the vehicle’s engine. Inspect all connections, including the alternator’s wiring, ground connections, and any other relevant connections. Loose connections or damaged wires can cause electrical problems. Check for any signs of corrosion or damage.
- Component Integrity: Assess the integrity of the pulley, the alternator shaft, and any associated components for damage. Any signs of cracks, breaks, or distortion warrant further investigation or replacement of the affected part. Carefully examine the pulley for any imperfections that might indicate underlying issues.
Ensuring Proper Pulley Seating
Proper pulley seating is paramount for the alternator’s function and the vehicle’s overall performance. Improper seating can result in belt slippage, poor alternator output, or even damage to the engine. The pulley should be securely and accurately positioned on the shaft.
- Torque Specifications: Refer to the vehicle’s repair manual for the precise torque specifications for tightening the pulley mounting bolts. Over-tightening can damage the components, while under-tightening can lead to loosening and eventual failure. Adhere to the recommended torque values to ensure proper seating and avoid further problems.
- Visual Alignment: Ensure the pulley is centered on the shaft, aligned with the mounting points, and that the belt properly engages with the pulley grooves. Any misalignment will likely result in improper belt tension.
Reconnecting the Battery and Starting the Vehicle
After completing all the checks and ensuring everything is in order, reconnect the battery and attempt to start the vehicle. This crucial step verifies the integrity of the entire system and allows for an immediate assessment of the functionality.
- Battery Reconnection: Carefully reconnect the battery cables, ensuring they are properly seated in their terminals. Tighten the clamps securely to prevent any electrical issues or potential corrosion.
- Starting the Vehicle: Attempt to start the vehicle. If the engine cranks but does not start, or if there are any unusual sounds or behaviors, further investigation is necessary. Pay attention to the vehicle’s behavior during startup.
Completion Checklist
This checklist aids in verifying that all necessary steps have been completed.
- Pulley seated correctly
- Belt tensioned appropriately
- Alternator securely mounted
- All connections intact and secure
- Battery cables reconnected and tightened
- Vehicle started successfully
Safety Considerations
Working on your vehicle’s alternator pulley can be a rewarding experience, but safety should always be your top priority. Proper precautions and safety gear are crucial to preventing injuries and ensuring a smooth and successful repair. This section Artikels essential safety measures to protect yourself throughout the process.Automotive repairs, especially those involving mechanical components, carry inherent risks. Understanding and mitigating these risks is key to a safe and successful outcome.
By following the guidelines Artikeld below, you can significantly reduce the likelihood of accidents and ensure a safe working environment.
Safety Precautions
Proper safety precautions are essential when working on any automotive component. These precautions safeguard you from potential hazards, ensuring a safe and efficient repair process.
- Wear appropriate personal protective equipment (PPE): Always wear safety glasses or goggles to protect your eyes from flying debris, especially when working with tools. A sturdy pair of work gloves will protect your hands from potential cuts or abrasions. Consider wearing a long-sleeved shirt and pants to prevent accidental cuts or scrapes from metal parts. If working in a dimly lit area or if there is a risk of falling objects, a hard hat is recommended.
- Disconnect the battery: Before starting any work on the alternator or any automotive component, ensure the battery is disconnected. A disconnected battery prevents accidental electrical shocks. This is a critical safety step to avoid electrocution.
- Secure the vehicle: Park the vehicle on a level surface and engage the parking brake. This prevents the vehicle from rolling, especially if you are working underneath it.
- Use proper lifting techniques: When working with heavy components, use proper lifting techniques to avoid strains or injuries. If a component is heavy, use a jack and jack stands to support the vehicle. Avoid lifting heavy objects alone.
- Be mindful of potential hazards: Working with automotive components can involve exposed sharp edges, moving parts, and hot surfaces. Exercise caution and awareness of potential hazards. Pay close attention to the surrounding area and to the components you are working with.
- Work in a well-ventilated area: Some automotive fluids and components can release harmful fumes. Work in a well-ventilated area to avoid inhaling these fumes. Ensure proper ventilation to prevent inhaling harmful fumes.
Potential Hazards
Understanding the potential hazards associated with working on automotive components is vital for preventing accidents. Recognizing these hazards allows you to implement effective safety measures to mitigate risks.
- Electrical hazards: Automotive components contain electrical systems. Improper handling can lead to electrical shocks. Always disconnect the battery before working on any electrical component.
- Mechanical hazards: Components like pulleys and belts can become loose or detach during removal, leading to injury from flying parts. Always secure components to prevent them from moving while working on them.
- Chemical hazards: Automotive fluids like brake fluid and engine oil can cause skin irritation or other health problems. Always wear appropriate protective gear and follow safety guidelines when handling fluids.
- Physical hazards: Working under a vehicle can expose you to the risk of falling objects or vehicle movement. Always use proper safety equipment and secure the vehicle before working under it.
Importance of Avoiding Potential Injuries
Preventing injuries is paramount during any automotive repair. By following safety procedures, you minimize the risk of accidents and maintain a safe working environment. Taking precautions helps prevent costly repairs to yourself.
- Injury prevention: Proper safety procedures are critical for preventing injuries. Follow these procedures to reduce the risk of injuries.
- Health and well-being: By preventing injuries, you prioritize your health and well-being. A safe work environment contributes to your overall well-being.
Final Wrap-Up
In conclusion, removing the alternator pulley involves careful planning, precise execution, and a strong understanding of safety precautions. By following the detailed steps Artikeld in this guide, you can confidently navigate this procedure. Remember to prioritize safety, use the correct tools, and adhere to the torque specifications. With this knowledge, you’ll be equipped to tackle this task with ease and efficiency, contributing to the optimal performance of your vehicle’s electrical system.
Essential Questionnaire
What are the common tools needed for removing an alternator pulley?
The specific tools required depend on the vehicle make and model. However, common tools include a socket set, a wrench, a pulley puller, and possibly a breaker bar. Always consult your vehicle’s repair manual for the exact tools and sizes needed.
What safety precautions should I take when removing an alternator pulley?
Safety is paramount. Always disconnect the battery before working on any vehicle component. Wear appropriate safety glasses and gloves. Ensure the vehicle is securely supported to prevent movement. Be mindful of sharp edges and potential hazards during the procedure.
What if the alternator pulley is stuck?
If the pulley is stuck, try using penetrating oil to loosen it. If that doesn’t work, you might need a pulley puller or a specialized tool to remove the pulley. If you’re unsure how to proceed, consult a qualified mechanic.
How do I know if I’m using the correct torque specifications for reinstallation?
Incorrect torque can lead to damage. Always refer to your vehicle’s repair manual for the precise torque specifications for tightening the pulley bolts. Using a torque wrench is crucial for ensuring accuracy.