

How to install freeze plugs is a crucial skill for anyone working with vehicles or water systems. Freeze plugs prevent engine or water system damage during freezing temperatures, and understanding the installation process is essential for maintaining these vital components. This guide delves into the intricacies of freeze plug installation, from identifying the problem to post-installation checks and preventative maintenance.
This comprehensive guide will walk you through the process, covering everything from identifying the signs of a failing freeze plug to replacing the damaged component with precision. It also touches on essential safety precautions and preventative maintenance to keep your system running smoothly and avoid future issues.
Introduction to Freeze Plugs
The relentless march of winter’s icy grip can wreak havoc on our infrastructure, from the humble water pipes to the intricate mechanisms within our vehicles. Freeze plugs, often overlooked, stand as silent sentinels against the destructive force of expanding ice. These crucial components are the unsung heroes of cold climates, safeguarding our systems from catastrophic damage.Freeze plugs are strategically placed within various systems to prevent catastrophic failure caused by freezing temperatures.
They are designed to withstand immense pressure and act as a vital barrier against the potentially explosive force of ice expanding within confined spaces. Their importance extends beyond mere convenience, encompassing safety and the preservation of valuable equipment.
Freeze Plug Function and Importance
Freeze plugs are designed to prevent water pipes, engine blocks, and other components from bursting due to the expansion of water into ice. They are small, strategically placed metal plugs that allow water to expand within a controlled manner, preventing pressure from exceeding safe limits. This crucial function ensures the integrity of systems in frigid environments, preserving valuable equipment and minimizing the risk of costly repairs or replacements.
Types of Freeze Plugs
Different applications demand different materials for freeze plugs. Cast iron freeze plugs, for instance, are often found in older engine blocks, known for their robust strength. Aluminum freeze plugs, favored in newer designs, are prized for their lightweight nature and improved thermal conductivity. The choice of material directly impacts the plug’s ability to withstand varying levels of pressure and temperature fluctuations.
- Cast iron freeze plugs are durable and resistant to high temperatures, making them ideal for heavy-duty applications, but they can be heavier than other options.
- Aluminum freeze plugs are lighter and more efficient at conducting heat, but their strength may be compromised in certain extreme conditions.
Common Freeze Plug Failure Issues, How to install freeze plugs
Freeze plug failure can arise from various sources. Corrosion, a slow and insidious enemy, can weaken the metal over time, leading to leaks and eventual failure. Physical damage, from impacts or improper installation, can compromise the integrity of the plug, making it vulnerable to leaks. Over time, fatigue can weaken the metal’s ability to withstand pressure.
Potential Consequences of Freeze Plug Failure
The consequences of freeze plug failure can range from inconvenient to catastrophic. Minor leaks can lead to water damage and costly repairs. More severe failures can result in complete system failure, potentially damaging or destroying the equipment. In vehicles, this can lead to engine block damage, requiring extensive and expensive repairs. In water systems, the result can be flooding, potentially causing significant damage to property and creating health hazards.
Comparison of Freeze Plug Materials
| Material | Strengths | Weaknesses |
|---|---|---|
| Cast Iron | High strength, resistance to corrosion, robust | Heavy, lower thermal conductivity |
| Aluminum | Lightweight, good thermal conductivity | Lower strength compared to cast iron, more susceptible to corrosion in some environments |
Freeze plug failure is a preventable issue with proper maintenance and replacement.
Identifying the Problem: How To Install Freeze Plugs

A failing freeze plug is a silent menace, a ticking time bomb lurking within your cooling system. Ignoring the subtle signs can lead to catastrophic engine failure, leaving you stranded and facing costly repairs. Understanding the telltale symptoms and employing proper inspection techniques is paramount to averting this potential disaster. Proactive vigilance is your best defense against engine-damaging leaks.
Signs of Freeze Plug Failure
Freeze plug failure is not always obvious, but its presence is frequently signaled by subtle yet significant symptoms. These warning signs, if ignored, can quickly escalate into a major mechanical crisis. Diligent observation is key to preventing costly and time-consuming repairs.
- Cooling System Overheating: A persistent rise in coolant temperature, often accompanied by the hissing sound of escaping pressure, signals a compromised freeze plug. This is a clear indication of a potential leak, requiring immediate attention. A classic example is a vintage car, where a failing freeze plug often manifests as an erratic rise in temperature during cold weather operation.
- Coolant Leaks: A telltale sign is the presence of coolant puddles beneath the vehicle, particularly in the vicinity of the engine block. This leak might be slow and almost imperceptible, but it still represents a significant loss of coolant. This can occur on modern vehicles as well as older ones, highlighting the importance of regular inspection.
- Loss of Coolant: A noticeable reduction in the coolant level in the reservoir is a strong indicator of a leak. A slow, but consistent decrease is a critical warning sign. This is often a prelude to a larger problem if not addressed immediately. A well-maintained vehicle should not be experiencing a substantial loss of coolant over a short period.
- Unusual Noises: Listen closely. A hissing or bubbling sound, especially noticeable when the engine is running, might indicate a freeze plug leak. The pressure buildup is the source of this unusual sound. This is particularly noticeable in engines under stress.
Visual Inspection Techniques
A thorough visual inspection is the first line of defense in identifying freeze plug damage. Careful observation can reveal critical defects, allowing for timely intervention.
- External Examination: Inspect the engine block meticulously for any signs of leakage or bulging around the freeze plug locations. Look for any evidence of coolant stains, particularly in the vicinity of the engine block. A careful visual inspection is often the first step in determining the source of coolant loss.
- Expansion Tank Monitoring: Regularly check the coolant level in the expansion tank. A consistent drop in the coolant level, coupled with the other symptoms, strongly suggests a leak. Observe the expansion tank for any unusual bubbles or signs of pressure.
- Close-Up Inspection: Use a magnifying glass or flashlight to examine the freeze plugs themselves for any signs of cracks, corrosion, or deformation. A bulging or misshapen freeze plug can signal a potential leak point. Carefully examine the surface of the freeze plug for visible signs of damage.
Pressure Testing for Leaks
A pressure test can confirm the presence of a leak, pinpointing the precise location of the problem.
- Procedure: Fill the cooling system with coolant and apply pressure. Using a pressure gauge, monitor the pressure to ensure it remains within the acceptable range. Monitor for any significant drop in pressure, which can signal a leak. A pressure test is a vital tool in diagnosing leaks, providing accurate and immediate results.
- Leak Detection: Inspect the engine block for any areas where coolant is leaking. The pressure test will highlight the precise location of the coolant leak. This technique is often used in conjunction with visual inspections to narrow down the potential locations of leaks.
Tools and Materials Required
The heart of any successful freeze plug replacement lies in the meticulous selection and precise application of tools. This meticulous preparation, a symphony of precision, safeguards against catastrophic failure and ensures a flawless outcome. Neglecting proper tools can lead to irreversible damage, highlighting the critical importance of choosing the right equipment.The appropriate tools and materials are essential for a successful freeze plug replacement.
Improper selection can lead to irreversible damage, potentially causing far greater problems than the original leak. This section meticulously details the tools and materials required, outlining the importance of each component for a safe and effective repair.
Essential Tools for Freeze Plug Replacement
A comprehensive toolkit is paramount for a successful freeze plug replacement. Each tool plays a specific role, ensuring accuracy and efficiency throughout the process. This section provides a detailed breakdown of the required tools, ensuring a complete understanding of their respective functions.
- Socket Wrenches and Sockets: Essential for loosening and tightening the bolts and nuts securing the freeze plugs. Different sizes of sockets are required to accommodate various bolt configurations, and a set of adjustable wrenches is necessary for situations where a socket won’t fit.
- Impact Wrenches: For extremely tight fasteners, an impact wrench dramatically reduces the effort required, significantly increasing the efficiency and safety of the process. These tools are crucial for stubborn bolts and nuts, preventing potential damage to the engine or other components.
- Torque Wrenches: Critical for achieving the precise torque specifications on the fasteners. Incorrect torque can lead to leaks or premature failure, emphasizing the need for precise torque application. These are vital for ensuring the integrity of the repair.
- Drain Pans and Catch Trays: Crucial for collecting the coolant and other fluids during the removal and replacement process. These prevent spills and ensure a clean work environment. Proper containment is essential for safety and environmental protection.
- Gasket Removal Tool: Facilitates the removal of old freeze plugs and their associated gaskets. These tools are specifically designed for effective and safe removal, preventing damage to the engine or surrounding components.
- Pry Bars (for certain applications): Useful for removing stubborn freeze plugs or components obstructing access. Pry bars must be used with extreme caution to avoid damaging the engine block or other surrounding components.
Safety Precautions
Safety must be paramount during any automotive repair. Following these guidelines ensures a secure and controlled environment.
- Wear appropriate safety gear: Protective eyewear, gloves, and sturdy footwear are essential for preventing injuries. This safeguards against potential hazards during the process.
- Work in a well-ventilated area: Coolant and other fluids can be hazardous. Adequate ventilation minimizes exposure to harmful fumes and gases.
- Disconnect the battery: Prevent accidental electrical shocks by disconnecting the vehicle’s battery before starting any repair. This precaution is crucial for personal safety.
- Use proper lifting techniques: Avoid straining yourself by using proper lifting techniques when handling heavy components or tools. This prevents injuries during the repair process.
- Follow manufacturer’s instructions: Consult the vehicle’s owner’s manual for specific guidelines and procedures, ensuring a safe and accurate repair.
Materials Required
The following materials are essential for a complete freeze plug replacement. Each component plays a crucial role in the integrity and longevity of the repair.
| Material | Description | Specifics |
|---|---|---|
| Freeze Plugs | Replacement freeze plugs | Select the correct freeze plug type for the specific engine application. Consult the vehicle’s repair manual for the appropriate freeze plug specifications. |
| Coolant | Top-quality coolant | Use the correct type of coolant specified in the vehicle’s owner’s manual. |
| Gaskets | New gaskets | Match the gaskets to the freeze plugs for a proper seal. Using incorrect gaskets can lead to leaks. |
| Sealant (Optional) | High-temperature sealant | For added protection, use a high-temperature sealant around the freeze plugs. This reinforces the seal and further prevents leaks. |
Preparing the Vehicle/System
The chilling grip of winter, or the relentless heat of summer, can inflict untold damage upon your vehicle’s vital coolant system. A compromised freeze plug, a silent sentinel of the engine’s heart, can lead to catastrophic failure if left unaddressed. This meticulous process demands a precise and calculated approach, ensuring the safety of the system and the integrity of the repair.
Draining the Coolant System
The coolant system, a complex network of passages and chambers, must be meticulously drained to facilitate safe access to the freeze plug. Improper draining can lead to coolant spills, contaminating the environment and potentially causing damage to surrounding components. This meticulous step is paramount to ensuring a successful repair.
- Locate the coolant drain plug, typically situated at the lowest point of the system. Consult your vehicle’s owner’s manual for precise location and proceed with extreme caution.
- Position a suitable container beneath the drain plug to collect the draining coolant. Ensure the container is large enough to accommodate the entire volume and is properly secured to prevent spillage.
- Carefully open the drain plug, allowing the coolant to flow into the container. Monitor the draining process to prevent sudden surges or unexpected flow rates.
- Once the coolant has completely drained, close the drain plug securely. A properly tightened plug prevents leaks and ensures the safety of the system.
Importance of Proper Coolant System Draining
Thorough coolant system draining is not merely a procedural step; it’s a critical safety measure. A partially drained system can lead to inconsistent pressure, potentially damaging the engine during the freeze plug replacement process. This careful step minimizes the risk of unexpected coolant leakage and allows for a clean working environment.
Removing the Affected Part
The affected freeze plug must be carefully removed to access the damaged area. This process requires precision and adherence to safety precautions. Improper removal can damage surrounding components, necessitating further repairs.
- Identify the exact location of the freeze plug. Refer to your vehicle’s repair manual for precise diagrams and procedures.
- Using appropriate tools, carefully loosen and remove any fasteners or clips securing the affected part to the coolant system.
- Disconnect any hoses or connections attached to the freeze plug. Ensure proper identification of these components to avoid damaging other parts.
- Carefully extract the freeze plug, ensuring you have a method for containing any residual coolant or debris.
Isolating the Freeze Plug Area
Isolation of the freeze plug area is crucial to preventing further coolant leaks and contamination. This step establishes a controlled working zone, allowing for efficient and precise replacement of the freeze plug.
- Identify any potential coolant pathways in the immediate vicinity of the freeze plug. This understanding is vital for preventing contamination.
- Employ appropriate seals or barriers to contain any residual coolant. This measure ensures a clean and controlled work environment.
- Use absorbent materials, like rags or towels, to absorb any remaining coolant or moisture. This proactive measure safeguards the working area.
Replacing the Freeze Plug
The heart of your cooling system, the freeze plug, stands sentinel against the relentless assault of frigid temperatures. A compromised freeze plug spells disaster, a potential for catastrophic engine failure. This section details the meticulous process of replacing a freeze plug, a procedure demanding precision and understanding of the intricacies of engine mechanics.
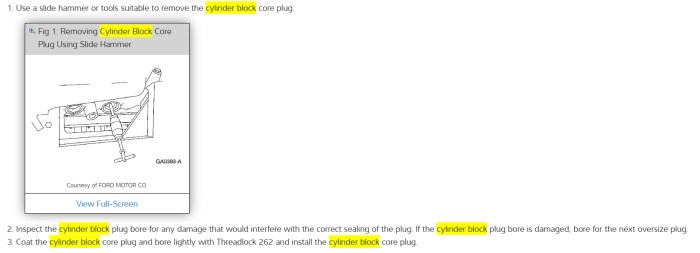
Removing the Old Freeze Plug
The removal of the damaged freeze plug is a critical first step. Improper removal can lead to further damage. Care must be taken to avoid damaging the surrounding engine block. This process often involves specialized tools and meticulous attention to detail.
- Locate the freeze plug’s position on the engine block. Consult the vehicle’s repair manual for precise identification. Incorrect location can result in unnecessary complications.
- Employ a freeze plug remover tool, designed specifically for this purpose. Ensure the tool’s proper fit to prevent slippage and potential damage.
- Apply penetrating oil to the freeze plug for extended periods. This aids in loosening the plug and reducing the risk of breakage during removal.
- Gently tap the freeze plug remover tool with a hammer, ensuring controlled strikes. Excessive force can damage the surrounding metal.
- Once the plug is loosened, carefully remove the tool and the freeze plug. Assess the plug for damage. A damaged plug may indicate underlying problems.
Installing the New Freeze Plug
The installation of the new freeze plug is equally critical. Correct installation guarantees lasting protection against freezing temperatures. Care must be taken to ensure a secure seal.
- Ensure the new freeze plug is the correct size and material for the application. Using the wrong plug can result in a compromised seal.
- Thoroughly clean the mating surface on the engine block to eliminate any debris or corrosion. A clean surface ensures a proper seal.
- Apply a suitable sealant, such as engine sealant, to the surface of the new freeze plug. This creates a robust seal.
- Position the new freeze plug precisely into its designated location. Ensure the plug aligns with the surrounding gasket. Improper alignment can lead to leaks.
- Secure the freeze plug using a suitable installation tool or a precise method of tapping with a hammer. Ensure the plug is fully seated and flush with the engine block.
Comparing Installation Methods
Various methods exist for installing freeze plugs. Each method carries potential advantages and disadvantages.
- Manual Tapping: A traditional method, this involves using a hammer and a suitable tool to tap the freeze plug into place. It can be effective but requires precision to avoid damage.
- Hydraulic Pressing: This method utilizes hydraulic pressure to precisely seat the freeze plug, minimizing the risk of damage. It often requires specialized equipment and may be more costly.
- Special Tools: Specific freeze plug installation tools may offer precise positioning and reduced risk of damage. These tools often require familiarity with their specific operation.
Step-by-Step Freeze Plug Replacement Procedure
| Step | Action | Important Considerations |
|---|---|---|
| 1 | Locate and identify the freeze plug. | Consult the vehicle’s repair manual. |
| 2 | Apply penetrating oil to the freeze plug. | Allow ample time for the oil to penetrate. |
| 3 | Use a freeze plug remover to carefully remove the old freeze plug. | Avoid excessive force. |
| 4 | Clean the mating surface on the engine block. | Remove any debris or corrosion. |
| 5 | Apply sealant to the new freeze plug. | Use a suitable engine sealant. |
| 6 | Install the new freeze plug and secure it. | Ensure proper alignment and seating. |
| 7 | Thoroughly check for leaks. | Leaks indicate improper installation. |
Post-Installation Checks
The meticulous installation of a freeze plug is not complete until rigorous post-installation checks are performed. These checks ensure the integrity of the coolant system, preventing catastrophic failures and ensuring optimal engine performance. A vigilant approach is paramount, as a single overlooked detail can lead to significant repercussions.Thorough post-installation checks are crucial to guarantee the system’s readiness for operation and long-term reliability.
These steps will guide you through a comprehensive verification process, from pressure testing to leak detection and coolant refill.
Coolant System Pressure Testing
Proper pressure testing verifies the seal integrity of the newly installed freeze plug and the overall strength of the coolant system. A faulty seal can lead to catastrophic pressure build-up, potentially damaging the engine block. This procedure is essential for ensuring the system’s readiness to withstand operational pressures.
- Initiate the pressure test with the engine cold and the coolant system drained of air. Ensure the system is depressurized before starting the test to prevent pressure surges.
- Employ a pressure gauge to monitor pressure within the system as specified in the vehicle’s repair manual. This ensures accurate readings and prevents potential system damage.
- Observe the pressure gauge’s readings throughout the test duration. Fluctuations or rapid pressure drops could indicate a leak or a faulty seal. This necessitates a careful examination of the coolant system.
- Maintain the pressure within the recommended operating parameters to prevent any potential failures. The pressure should remain consistent, demonstrating the system’s ability to withstand operational stress.
- After the pressure test, carefully release the pressure to avoid potential injury and coolant spillage. A controlled release prevents uncontrolled pressure release.
Leak Detection
A diligent leak check is paramount to ensuring the system’s long-term performance and longevity. Ignoring potential leaks can lead to substantial coolant loss, causing engine overheating and potentially severe damage.
- Visually inspect the entire coolant system, including hoses, connections, and the freeze plug area, for any signs of leaks. Pay close attention to areas where coolant lines connect to the engine block. This detailed inspection ensures no subtle leak is missed.
- Use a leak detection solution (such as a dye or a special liquid) to pinpoint hidden leaks that might not be visible. This solution aids in identifying subtle leaks that might otherwise go unnoticed. A dye is a helpful aid in this process.
- Observe the system for any signs of wetness, discoloration, or pooling fluid. A systematic examination of all potential leak points is necessary to prevent catastrophic failures.
- Thoroughly check the freeze plug area for any signs of leakage around the installed plug. This ensures the seal is intact and preventing coolant loss. A careful examination of the installation site is critical.
Coolant System Refill
Correctly refilling the coolant system is crucial to ensure optimal engine performance and prevent overheating. Using the incorrect coolant type can cause serious damage and compromise the engine’s lifespan.
- Ensure the engine is cool before handling any coolant or performing any procedures. Prioritizing safety is essential when working with hot components.
- Refer to the vehicle’s owner’s manual for the appropriate coolant type and capacity. The correct type and volume are vital to the engine’s proper operation.
- Carefully add the specified coolant to the coolant reservoir or expansion tank, monitoring the level to ensure the correct amount is added. Overfilling can cause issues.
- Start the engine and let it run for a few minutes to circulate the coolant through the system. This ensures the coolant is properly distributed throughout the system.
- Check the coolant level again after the engine has cooled. Add more coolant as needed to maintain the proper level.
Thorough Leak Check Post-Installation
A comprehensive leak check after installation ensures the long-term reliability of the repaired system. This critical step prevents potential future issues, guaranteeing the system’s safety and efficiency.
- Park the vehicle on a level surface and allow the engine to cool completely.
- Inspect all connections, hoses, and the freeze plug area for any signs of leaks or fluid buildup.
- Use a flashlight or other illumination to thoroughly inspect areas that are hard to see directly.
- Look for any discoloration or pooling of fluid beneath the vehicle or around the engine.
- Repeat the leak check at various intervals over the next few days to detect any developing leaks. Proactive checks ensure potential issues are addressed quickly.
Prevention and Maintenance
The chilling grip of winter, the relentless pounding of summer heat—these environmental extremes can relentlessly assault your vehicle’s vital coolant system. Failing to proactively maintain this critical system can lead to catastrophic engine failure, leaving you stranded and facing costly repairs. This section details crucial preventative measures to safeguard your engine from the perils of freeze-plug failure and ensure years of trouble-free operation.Understanding the subtle stresses exerted on your engine’s core components is paramount.
A properly maintained coolant system is the engine’s shield against the corrosive effects of time and temperature fluctuations. Ignoring these precautions can result in premature wear and tear, necessitating expensive replacements and potentially catastrophic damage.
Preventative Measures to Avoid Freeze Plug Failure
Regular vigilance and proactive maintenance are the cornerstones of preventing freeze plug failure. Maintaining the proper coolant levels and type, along with diligent monitoring of the coolant system, are critical steps in this endeavor.
- Coolant Type Selection: Employing the correct coolant type for your specific application is paramount. Consult your vehicle’s owner’s manual for the recommended coolant type and ensure you are using a quality product that conforms to the standards Artikeld in the manual. Using the wrong type of coolant can significantly reduce its effectiveness in preventing corrosion and damage, leading to premature freeze plug failure.
- Proper Coolant Levels: Maintaining the correct coolant level is essential. Insufficient coolant leaves vital engine components vulnerable to overheating. A visually clear coolant reservoir is your guide to the correct level. Overfilling can also lead to serious problems, including coolant leaks.
- Regular System Checks: Conduct routine visual inspections of the coolant system. Pay particular attention to hoses, clamps, and connections. Early detection of leaks, corrosion, or other anomalies can forestall catastrophic failures. A meticulous inspection can help catch subtle leaks before they escalate into major problems.
- Corrosion Protection: Utilize corrosion inhibitors in the coolant system to protect components from oxidation and decay. Corrosion can severely weaken freeze plugs, making them susceptible to cracking and leakage under stress.
Importance of Regular Coolant System Maintenance
A meticulously maintained coolant system is akin to a well-oiled machine. Regular checks and timely repairs are crucial to preventing costly breakdowns and ensuring optimal engine performance.
- Proactive Leak Detection: A well-maintained coolant system is less prone to leaks. Addressing any coolant loss promptly is vital. Leaks, no matter how small, can lead to overheating, freeze plug damage, and catastrophic engine failure.
- Regular Flush and Fill: Regular flushing of the coolant system is vital for removing contaminants and corrosion byproducts that can weaken the system and cause premature failure. Use of a quality coolant flush and fill solution, as directed by your owner’s manual, is essential.
- Monitoring Temperature: Regularly monitoring the engine temperature is crucial for detecting any overheating issues. An engine operating outside its optimal temperature range is under tremendous stress, potentially leading to freeze plug failure.
Proper Coolant Type for Different Applications
The correct coolant type for your vehicle’s application is crucial. Using the wrong coolant can severely damage your engine.
| Application | Recommended Coolant Type |
|---|---|
| Vehicles with Aluminum Radiators | Coolants specifically formulated for aluminum radiators to prevent corrosion. |
| Vehicles with Iron or Steel Radiators | Coolants formulated for iron or steel radiators, which may not contain certain corrosion inhibitors found in aluminum-specific coolants. |
| High-Performance Vehicles | Coolants designed for higher temperatures and pressures, ensuring peak performance. |
Maintaining the Coolant System
Maintaining a pristine coolant system involves meticulous attention to detail and adherence to manufacturer specifications.
- Proper Flushing Techniques: Utilize specialized flushing solutions and procedures to ensure complete removal of contaminants and debris. Follow the manufacturer’s instructions for optimal results.
- Using High-Quality Coolant: Employ high-quality coolant to enhance the system’s longevity and prevent corrosion. Consult your owner’s manual for specific recommendations.
- Adhering to Manufacturer Specifications: Always adhere to the manufacturer’s recommendations for coolant type, maintenance intervals, and other pertinent details.
Regular Coolant System Maintenance Checklist
Regular coolant system maintenance is crucial for optimal engine performance and longevity.
- Visual Inspection: Inspect hoses, clamps, and connections for leaks or damage.
- Coolant Level Check: Verify coolant level in the reservoir.
- Coolant Flush: Schedule coolant flushes as per manufacturer recommendations.
- Temperature Monitoring: Monitor engine temperature during operation.
- Coolant Type Verification: Confirm coolant type is appropriate for your vehicle.
- Professional Inspection: Seek professional inspection if any anomalies are detected.
Troubleshooting Common Issues
The delicate dance of replacing freeze plugs can, at times, lead to unforeseen complications. A seemingly straightforward procedure can transform into a frustrating battle against leaks and malfunctions. Understanding the potential pitfalls and their remedies is paramount to a successful and lasting repair. Proper diagnostics and decisive action are key to navigating these challenges and restoring the integrity of your cooling system.
Identifying Leaks After Installation
A persistent leak after installing new freeze plugs demands meticulous investigation. Visual inspection, coupled with pressure testing, is crucial. A leak may manifest as a slow drip, a steady stream, or a noticeable wet spot. Carefully examine the area surrounding the freeze plug installation site, paying close attention to any signs of moisture. A soapy water solution can help pinpoint the precise leak location.
This method involves applying the solution around the suspected area, allowing the bubbles to indicate the leak’s origin.
Improper Installation Issues
Errors during installation can manifest as leaks, or, in extreme cases, catastrophic failures. Ensure the freeze plug is properly seated in the cylinder’s bore. Misalignment, improper torque, or using the wrong size plug can lead to significant problems. A slight misalignment can create a microscopic gap, which, under pressure, may become a leak point. Verify the plug’s proper seating with a feeler gauge to ensure a snug fit.
Table of Common Problems and Solutions
| Problem | Solution |
|---|---|
| Leak at Freeze Plug Installation Site | Re-torque the plug to the manufacturer’s specifications. Inspect for damage or misalignment. If necessary, re-install the plug, ensuring proper seating. Use a leak detection solution for precision leak identification. |
| Leak at a Different Engine Component | If the leak is not directly at the freeze plug, check the coolant hoses, water pump, or radiator for leaks. A faulty gasket, worn seals, or a damaged component could be the source. Replacing the faulty component may be required. |
| Freeze Plug Will Not Seat Properly | Ensure the freeze plug is the correct size and material for the engine’s specific application. Using the wrong size or material can lead to issues in seating and cause leaks. Employ the correct installation tools and techniques. Inspect the cylinder bore for imperfections or damage. A damaged bore will require repair before installing the freeze plug. |
| Excessive Leakage After Installation | A significant leak necessitates immediate attention. The cooling system should be depressurized and checked for any additional leaks. Investigate the possibility of a coolant passage obstruction. Consult a qualified mechanic if the problem persists. |
Fixing Leaks After Installation
Fixing leaks after installation demands a methodical approach. First, identify the exact location of the leak using soapy water. Once located, the leak needs to be addressed directly. If the leak is minor and localized to the freeze plug, carefully re-torque the plug to the correct specifications. If the leak persists or is extensive, the freeze plug may need to be replaced, along with proper assessment of the surrounding components.
Consult a repair manual for specific torque specifications and procedures. If the issue persists, consider seeking professional assistance.
Final Conclusion

In conclusion, replacing freeze plugs is a multifaceted task demanding careful attention to detail. By following the steps Artikeld in this guide, you can effectively install new freeze plugs, ensuring the integrity and longevity of your system. Remember, proper maintenance and prevention are key to avoiding costly repairs down the road.
FAQ Guide
What are the common symptoms of a failing freeze plug?
Common symptoms include coolant leaks, unusual noises from the engine, and a drop in coolant levels. A visual inspection is crucial to spot any visible damage.
What tools are essential for freeze plug replacement?
A comprehensive tool kit is necessary, including wrenches, sockets, pliers, a drain pan, and safety glasses. The specific tools will depend on the vehicle’s make and model and the type of freeze plug.
How do I properly drain the coolant system before replacing a freeze plug?
Consult your vehicle’s owner’s manual for specific instructions, but generally, locate the drain plug, open it, and allow the coolant to drain completely into a suitable container. Ensure the area is well-ventilated.
What are the potential consequences of a freeze plug failure?
Freeze plug failure can lead to coolant leaks, engine overheating, and costly repairs. In severe cases, it can damage the engine or other critical components.