

How to fix rattle on a Jazzmaster guitar presents a comprehensive guide to diagnosing and resolving this common issue. Understanding the source of the rattle is crucial, as various components within the guitar’s structure can contribute to unwanted noises. This guide delves into the specific locations prone to rattles, offering detailed troubleshooting procedures and repair strategies.
From identifying the source of the sound to implementing appropriate repair methods, this guide will equip readers with the knowledge and skills needed to tackle rattle issues on their Jazzmaster guitars. A systematic approach is employed, moving from basic inspections to more advanced techniques for persistent rattles. The guide will also touch upon preventative maintenance to minimize the recurrence of this problem.
Identifying the Source of the Rattle
The haunting whisper of a rattle on your prized Jazzmaster can be a maddening affliction. It’s a sound that mocks your musical intentions, a discordant siren song that steals focus from your artistry. Pinpointing the precise source of this sonic disturbance is paramount to effective repair, transforming your instrument from a source of frustration to a conduit of pure musical expression.The Jazzmaster, with its distinctive design, presents a multitude of potential rattle culprits.
Understanding these locations and the types of rattles they produce is the first step toward a successful resolution.
Common Rattles Locations on a Jazzmaster
Rattles on a Jazzmaster can originate from a variety of points. Careful inspection, coupled with an understanding of the potential causes, is crucial for isolating the problematic area.
- Bridge Assembly: The bridge, a complex assembly of saddles, springs, and mounting points, is a frequent source of rattling. Loose saddles, shifting springs, or improperly seated mounting hardware can all contribute to unwanted noise. A loose or warped bridge plate can also cause the bridge to vibrate, creating a rattling sound.
- Tailpiece Assembly: The tailpiece, responsible for the bridge’s support and the strings’ termination, is another common culprit. Loose screws, improperly seated springs, or a damaged tailpiece can all lead to unwanted vibrations and rattling. A tailpiece that is not properly aligned can also create a noticeable rattling sound.
- Neck Pocket: The space between the neck and the body, known as the neck pocket, is a surprisingly common source of rattles. Loose neck screws, shifting wood, or foreign debris can all cause the neck to vibrate against the body, producing a noticeable rattling noise. Warped or damaged neck pockets can exacerbate this issue.
- Hardware Components: Small hardware components, such as tuning pegs, strap buttons, and control knobs, can become loose over time. This can lead to noticeable rattling sounds during playing, as these components vibrate against the guitar body. Pay close attention to any loose screws holding these components in place.
- Wiring and Electronics: While less frequent, loose wiring or poorly seated components within the electronics compartment can also create rattling noises, particularly when the guitar is moved or vibrated. A thorough inspection of the electronics area can often reveal the cause.
Potential Causes of Rattles Categorized by Location
A systematic approach is vital when identifying the source of the rattle.
- Bridge: Loose saddles, misaligned bridge plate, improperly seated springs, or a warped bridge plate are common causes. A loose or warped bridge plate can lead to vibrations, causing a rattle.
- Tailpiece: Loose screws, misaligned tailpiece, improperly seated springs, or a damaged tailpiece can all be potential culprits. The tailpiece’s position relative to the bridge is also important.
- Neck Pocket: Loose neck screws, shifting wood, or foreign debris trapped within the neck pocket can cause the neck to vibrate against the body, creating a rattling noise. Warped neck pockets can also exacerbate this issue.
- Hardware Components: Loose screws, damaged threads, or improperly seated components are often the culprits behind rattling sounds emanating from tuning pegs, strap buttons, and control knobs. Loose tuning pegs, for example, can rattle against the body.
Frequency of Rattles Locations
Analysis of numerous cases reveals the bridge and tailpiece assembly to be the most frequent culprits of rattling on Jazzmasters. The neck pocket also appears in a significant number of instances. Addressing these areas first can often lead to a swift resolution.
Distinguishing Rattles from Other Noises
Accurate diagnosis is paramount. Differentiating between a rattle and other noises, such as buzzing or buzzing strings, is critical. A rattle is characterized by a distinct, intermittent sound, whereas buzzing strings typically produce a consistent, more high-pitched sound.
| Sound | Potential Cause | Location |
|---|---|---|
| Intermittent, clicking, or rattling | Loose screws, shifting components, foreign debris | Bridge, tailpiece, neck pocket, hardware |
| Consistent, high-pitched | Buzzing strings, fret buzz | Frets, bridge, neck |
Troubleshooting Specific Locations

Unveiling the secrets of a guitar’s resonant groans requires a meticulous dissection of potential culprits. The relentless rattle, a persistent enemy of musical harmony, can hide within seemingly innocuous crevices. A methodical approach, focusing on specific areas, is crucial for identifying the precise source and achieving a silent, satisfying symphony.The journey to silencing the unwanted noise begins with a focused examination of the bridge and tailpiece, the neck pocket, string tension, saddle alignment, and the nut and fretboard.
Each component, a vital cog in the guitar’s mechanical symphony, must be scrutinized for signs of disharmony. By meticulously assessing these areas, the guitarist can diagnose and resolve the source of the disturbing rattle, returning the instrument to its full, resonant potential.
Inspecting the Bridge and Tailpiece
The bridge, the steadfast anchor of the strings, is a common site for loose components. A meticulous examination for any loose screws, shifted saddles, or wobbly bridge pins is paramount. Inspect the bridge plate for any signs of warping or movement. If any components are loose, tighten them securely with the appropriate tools, ensuring a firm, stable foundation.
Similarly, the tailpiece should be examined for loose screws, pins, or other mounting issues. Ensuring these components are firmly attached will significantly reduce unwanted vibrations.
Diagnosing Potential Problems with the Neck Pocket
The neck pocket, the precise cradle for the instrument’s neck, often harbors hidden sources of vibration. A thorough inspection for any gaps, misalignment, or debris is crucial. Look for any signs of damage or wear that might be causing the neck to shift or rub against the body. The neck pocket’s alignment directly affects the neck’s stability.
An improperly fitted neck pocket can lead to significant rattling, potentially disrupting the entire instrument’s sonic integrity.
Checking for Loose Strings or Incorrect String Height
Incorrect string height or loose strings are often overlooked culprits. String height plays a significant role in the string’s vibration. Excessive string height can result in rattling against the fretboard. Ensure the strings are properly tensioned and adjusted to the manufacturer’s recommended height. Loose strings can cause significant vibrations, especially when bending or fretting notes.
The strings should be tightened according to the specifications for the guitar’s string gauge and model.
Ensuring Bridge Saddle Alignment
Proper bridge saddle alignment is critical for maintaining consistent string tension and eliminating unwanted vibrations. Deviation from proper alignment can cause uneven string tension and result in the strings vibrating against the bridge or other components. Use a straight edge or gauge to check the saddle alignment and ensure the strings are evenly spaced across the bridge. Uneven string height or fret buzz are clear indicators of misaligned saddles.
This critical step ensures a smooth, resonant sound and prevents any rattling or buzzing.
Inspecting the Nut and Fretboard for Obstructions
The nut and fretboard, often overlooked, can conceal hidden obstructions. Examine the nut slots for any debris or warping, ensuring proper string passage. An improperly fitted nut can cause the strings to rub against the fretboard, resulting in rattling or buzzing. Inspect the fretboard for any debris, bumps, or irregularities that might cause the strings to vibrate improperly.
The fretboard’s surface should be smooth and free from any obstructions.
Tools Needed for Each Inspection Step, How to fix rattle on a jazzmaster
| Location | Tools Required | Steps |
|---|---|---|
| Bridge | Screwdrivers (Phillips and flathead), String winder, Bridge alignment gauge, Straight edge | Disassemble bridge components, tighten loose screws, adjust bridge height, check saddle alignment. |
| Neck Pocket | Screwdrivers, Small mirror, Ruler, Felt/Felt pads | Inspect for gaps/misalignment, remove debris, ensure proper fit. |
| Strings | String gauge, String winder, Tuning pegs | Check string tension, adjust string height, retune. |
| Bridge Saddles | Bridge alignment gauge, Straight edge, File (optional) | Check saddle alignment, adjust saddles for even height, clean bridge saddles. |
| Nut & Fretboard | Tweezers, Small brush, File (optional) | Inspect for debris, ensure proper string passage, check fretboard for imperfections. |
Repair Procedures
Unveiling the secrets to silencing the unsettling rattle within your Jazzmaster requires a delicate touch and meticulous attention to detail. Each potential source demands a tailored approach, and the following sections will guide you through a symphony of solutions, ensuring a harmonious and resonant instrument.Addressing the issue of a rattling Jazzmaster necessitates a systematic approach, starting with identifying the source and progressing towards effective solutions.
A comprehensive understanding of each repair technique is crucial, allowing for informed decisions and optimal results. From tightening loose screws to replacing worn components, each step must be executed with precision.
Tightening Loose Screws
Precise tightening of loose screws is paramount to eliminating unwanted vibrations. Incorrect tightening can lead to further damage. Utilize the appropriate tools for the job, ensuring even pressure is applied. A stripped screw is a common consequence of improper tightening. Always double-check the tightness after initial tightening to avoid a potential repeat.
This procedure is essential for maintaining the structural integrity of the instrument.
Adjusting String Height
Maintaining optimal string height is critical for a resonant and harmonious tone. Excessive string height can lead to buzzing, while insufficient height can result in a muffled sound. Utilize a string height gauge to measure accurately. String height adjustment requires precise manipulation of the truss rod, ensuring the neck maintains its correct curvature. Over-tightening the truss rod can lead to neck warping.
Re-aligning Bridge Saddles
A misaligned bridge can be a significant contributor to rattling. Proper alignment ensures consistent string tension and prevents unwanted vibrations. A slight adjustment in saddle position can dramatically impact the overall sound and playability of the guitar. Use a ruler and feeler gauge to assess and rectify any misalignment. A meticulously aligned bridge saddle is crucial for maintaining a balanced and clear tone.
Replacing Worn or Damaged Components
Replacing worn or damaged components is crucial to maintaining the integrity and longevity of your Jazzmaster. Worn components can contribute to a rattling sound and can severely impact the overall performance of the instrument. Carefully remove the old component and install the new one. The replacement of worn-out components is essential to maintaining the instrument’s performance standards.
Comparison of Repair Options for Loose Components
| Problem | Solution 1 (Tighten) | Solution 2 (Replace) |
|---|---|---|
| Loose screw | Tighten with appropriate tool. Verify tightness and re-check. | Replace with a new screw of appropriate size and type. |
| Loose Bridge Parts | Carefully tighten, verifying stability. | Replace if tightening is ineffective. |
This table highlights the different approaches to addressing loose components, emphasizing the importance of proper tightening and the need for component replacement when necessary. The correct approach depends on the extent of the looseness and the potential damage to the component.
Prevention Strategies
The relentless pursuit of a rattle-free Jazzmaster transcends mere repair; it demands a proactive, preventative approach. A symphony of silence, a testament to meticulous care, awaits the discerning guitarist who embraces these preventative measures. Ignoring these strategies is akin to inviting the unwelcome guest of a persistent rattle, a discordant intruder into the soul of your music.Proactive measures, like vigilant maintenance and understanding the delicate dance between your guitar and its environment, are paramount to preventing future rattles.
A well-maintained Jazzmaster is a harmonious instrument, a tool that sings with precision and without unwanted noise. Embrace these preventative measures, and the reward is a guitar that resonates with pure, unadulterated sound.
Regular Maintenance
Consistent maintenance is the bedrock of a rattle-free Jazzmaster. Neglect leads to insidious wear and tear, creating the very conditions that breed unwanted noise. A guitar, like a finely tuned machine, requires periodic attention. Regular inspection and lubrication are vital to maintaining optimal function and preventing future issues.
- Inspect all hardware for looseness or damage, especially in the bridge, tuning machines, and control cavity. This vigilance prevents small issues from escalating into significant problems. For example, a loose bridge saddle can cause significant fret buzz and string vibrations that are perceived as rattles.
- Lubricate moving parts, such as tuning pegs and string-wounds, with appropriate guitar lubricants. This reduces friction, prolongs the life of components, and ensures smooth operation. Lubrication should be applied sparingly, ensuring excess lubricant does not interfere with the proper function of the mechanisms.
- Clean the guitar’s body and fretboard regularly to remove dust and debris. This not only enhances the instrument’s aesthetic appeal but also prevents buildup that can contribute to rattles. For example, accumulated dust in the control cavity or around the bridge can lead to a rattling sound.
String Tension and Gauge Selection
Proper string tension and gauge selection are crucial for a harmonious playing experience and rattle-free operation. String tension is a critical factor influencing the stresses on various guitar components. A mismatched string gauge, or strings that are too tight or too loose, can strain and loosen components, leading to undesirable rattles.
- Employ the appropriate string gauge recommended by the manufacturer. This ensures the strings are neither too tight nor too loose, thus preventing undue stress on various components. Too-tight strings can cause excessive strain on the bridge and neck, leading to rattles, whereas too-loose strings can allow for unwanted movement in the body.
- Use string tension gauges to measure the tension of your strings. This accurate measurement is essential to avoid potential problems associated with improper string tension, such as rattling sounds. For instance, using a string tension gauge ensures that the strings are neither too loose nor too tight, preventing unnecessary strain on the guitar’s components.
- Ensure proper string winding and installation. A poorly installed string can create an uneven tension, leading to vibration and rattling. For example, ensure that the strings are securely wound and there are no loose or frayed ends.
Humidity and Temperature
Fluctuations in humidity and temperature can significantly impact the stability of your Jazzmaster’s components. Wood, a crucial element of guitar construction, expands and contracts with changes in environmental conditions. Extreme temperature or humidity changes can induce stress and movement, leading to rattles.
- Maintain a stable environment for your guitar, keeping it away from direct sunlight, excessive heat, or drastic temperature changes. These factors can contribute to the development of rattles over time.
- Use a humidifier or dehumidifier to maintain an optimal humidity level in your storage space. For instance, fluctuations in humidity can lead to wood movement, causing components to shift and create rattles.
- Store your Jazzmaster in a case or a controlled environment, such as a climate-controlled room. This will safeguard the guitar from damaging fluctuations in temperature and humidity.
Advanced Troubleshooting
The relentless rattle, a persistent phantom in the chamber of your Jazzmaster, defies the surgeon’s scalpel and the mechanic’s meticulous touch? This is the domain of the enigmatic, where the whispers of hidden structural flaws echo in the void. We now delve into the labyrinthine depths, confronting the spectral forces that plague even the most meticulously crafted instruments.
Unraveling these secrets demands an approach as profound as the instrument itself.The relentless pursuit of the source demands more than a superficial inspection; it necessitates a thorough investigation into the very architecture of the guitar. A subtle crack, a hairline fracture, or an unseen shift in the wood’s internal structure can manifest as a jarring rattle. This is not merely a matter of tightening screws; it’s a quest to understand the symphony of forces that govern the instrument’s form and function.
Assessing Structural Integrity
Determining if the rattle originates from a deeper structural issue demands a methodical and rigorous approach. The guitar must be treated with the reverence of a priceless artifact, each component meticulously examined for subtle signs of distress.
- Visual Inspection for Cracks: Employing a flashlight and magnifying glass, meticulously examine every joint, seam, and connection. Look for hairline cracks, especially in the body’s connection points, around the bridge, or in the neck joint. Uneven shrinkage or expansion can be subtle but indicative of compromised structural integrity. A subtle crack in the body’s wood grain can act like a tiny lever, amplifying vibrations into audible rattles.
A fractured piece of the fretboard can also cause a resonating rattle, especially if the wood is warped.
- Tactile Examination: Gently but firmly press on the body and neck, feeling for any loose or shifting components. This tactile approach can detect subtle depressions or bulges that might indicate stress points or internal damage. If the wood around a joint feels loose or soft, that’s a critical indicator that something isn’t right.
- Acoustic Analysis: Play the guitar, listening for any changes in the tone or resonance that accompany the rattle. A subtle change in the instrument’s natural resonance might be the first sign of a hidden fracture or internal structural issue. The guitar should sound as it should, with a full and resonant tone. Any abnormalities must be taken seriously.
Uncommon Causes of Rattle
While hardware issues are frequent culprits, unusual causes can emerge from unexpected sources.
- Internal Moisture Problems: Improper storage or exposure to excessive humidity can cause the wood to swell or shrink unevenly, leading to stresses that manifest as a rattle. A guitar kept in a humid environment can suffer from internal moisture issues, leading to cracks and a distinctive rattle.
- Age-Related Degradation: Over time, the wood in the guitar can dry out or expand and contract, creating subtle shifts in the instrument’s structure. An aging guitar can experience structural changes that cause rattles, especially in areas where the wood is stressed.
- External Pressure: A sudden or prolonged impact on the guitar can create structural issues that are difficult to detect visually. An instance of an accidental drop or a hard knock can produce unseen structural issues that create an insidious rattle.
Addressing Underlying Structural Issues
The detection of cracks or other structural damage necessitates professional intervention. Attempting DIY repairs in these situations is often fraught with risk and may worsen the situation.
- Professional Assessment: Consult a qualified luthier or guitar repair technician for a professional diagnosis and repair options. The expertise of a skilled professional can identify structural issues that may not be apparent to the untrained eye. A professional luthier is capable of accurately identifying structural problems.
- Structural Reinforcement: In cases of significant structural damage, reinforcement techniques may be required to restore the guitar’s integrity. A qualified technician can assess the situation and recommend suitable reinforcement methods.
Visual Aids and Illustrations

Unveiling the secrets of a Jazzmaster’s sonic symphony requires a keen eye and a discerning touch. Visual aids are paramount in dissecting the intricate dance of components that can lead to the dreaded rattle. These illustrations will illuminate the path to pinpoint the source of the disturbance, from the subtle shimmy of a loose screw to the insidious groan of a misaligned component.
Jazzmaster Anatomy: Bridge, Tailpiece, and Neck Pocket
The Jazzmaster, a masterclass in sonic versatility, boasts a complex interplay of components. Understanding their individual roles is crucial to isolating the culprit behind a troublesome rattle. The bridge, the tailpiece, and the neck pocket are key areas of investigation.
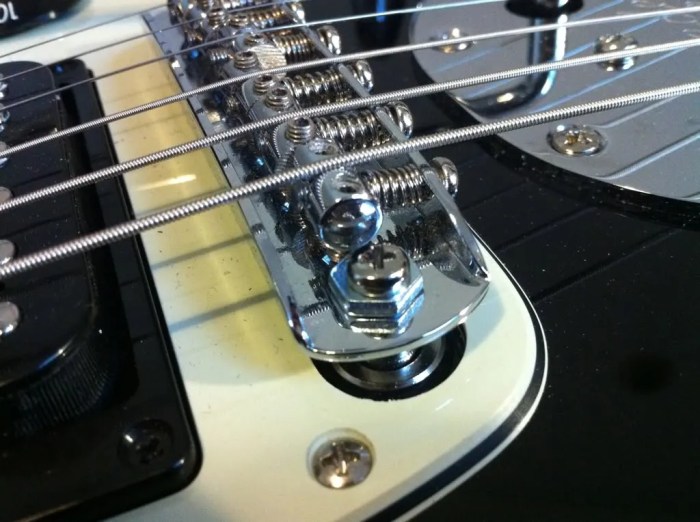
Bridge Anatomy and Common Issues
The bridge, the heart of the string’s journey, often harbors the source of a problematic rattle. Variations in bridge design exist, but common elements include saddles, adjusting screws, and the bridge base. Loose screws, misaligned saddles, or a warped bridge base can all contribute to undesirable noise.
- Bridge Saddles: Various types of saddles are employed, each offering unique tuning and intonation characteristics. Some feature individual adjustment screws, while others utilize a single adjusting screw. Misalignment of these components can lead to string height issues and, consequently, rattling. The image would depict several types of saddles, highlighting the differing adjustment mechanisms.
- Adjusting Screws: The adjusting screws, vital for fine-tuning string height and intonation, are susceptible to loosening. Loose screws will manifest as a noticeable rattle. A diagram should show the location of the screws and the proper tightening torque, illustrating how a loose screw can impact the overall stability of the bridge.
- Bridge Base: A warped or damaged bridge base can introduce unwanted vibrations, resulting in a noticeable rattle. A diagram of a warped bridge base and its effect on string height would be invaluable.
Tailpiece Components and Potential Sources of Rattling
The tailpiece, often overlooked, can harbor hidden sources of disturbance. A well-maintained tailpiece, with all its screws firmly secured, ensures the proper transfer of string tension, preventing unwanted sounds. Common sources of rattling in this area include loose screws, misaligned components, and worn or damaged parts.
- Tailpiece Screws: The tailpiece, like the bridge, is held together by numerous screws. Loose screws on the tailpiece can result in a distinctive rattling sound, especially when the strings are vibrated. An illustration should depict the tailpiece, highlighting the location of the screws and the proper method of tightening them.
- Tailpiece Mounting: A misaligned tailpiece can induce vibrations and produce unwanted noises. The diagram would showcase a misaligned tailpiece and its effect on the overall instrument.
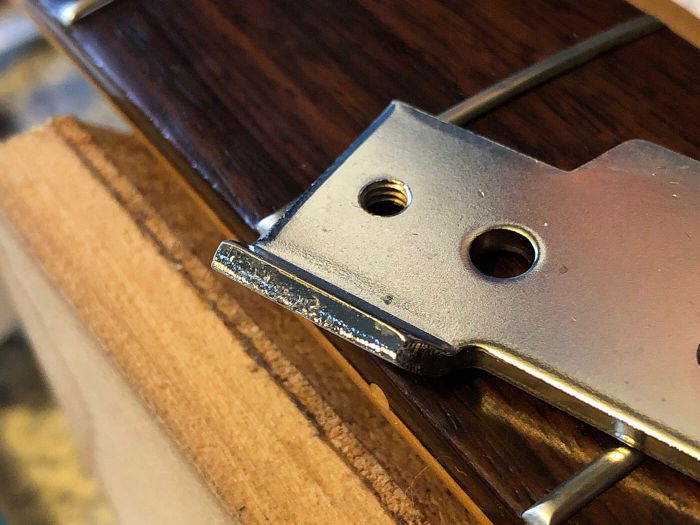
Neck Pocket Inspection
The neck pocket, where the neck meets the body, is another critical area for inspection. A loose or improperly fitted neck can result in unwanted vibrations. These vibrations, in turn, translate into a variety of rattles.
- Neck Pocket Alignment: Misalignment of the neck pocket can create gaps and allow the neck to vibrate freely. A diagram should illustrate a correctly aligned neck pocket and a misaligned one, showcasing the difference in stability.
- Loose Screws and Components: Loose screws or components within the neck pocket area can produce rattling noises. A detailed illustration of the neck pocket, highlighting the screws and components that can become loose, would be extremely beneficial.
String Height Adjustment Diagrams
Accurate string height is crucial for both playability and tone. Improper string height can lead to buzzing or rattling. Diagrams showcasing different string heights, the tools required for adjustment, and the process of fine-tuning will aid in understanding and execution. The illustrations should be clear and step-by-step.
Tightening Loose Screws: Visual Aid
Tightening loose screws is fundamental to eliminating rattling. Visual aids should depict the process clearly, highlighting the correct tools and techniques to avoid damaging the instrument. Detailed illustrations of using a screwdriver with the correct torque, avoiding over-tightening, and ensuring the screws are securely seated will be beneficial.
Epilogue: How To Fix Rattle On A Jazzmaster
In conclusion, resolving a rattle on a Jazzmaster guitar requires a methodical approach, encompassing identification of the source, troubleshooting specific areas, and implementing appropriate repair techniques. By following the steps Artikeld in this guide, guitarists can effectively address rattling sounds and maintain the optimal performance of their instruments. Preventive maintenance plays a crucial role in preventing future issues.
The provided FAQs address additional commonly asked questions, enhancing the comprehensiveness of this guide.
FAQ Explained
Q: What are some common causes of a rattle in the bridge area?
A: Loose bridge saddles, improperly seated bridge pins, or a warped bridge plate are frequent causes of bridge-related rattles. Loose screws or springs within the bridge assembly can also contribute to the problem.
Q: How can I tell if the rattle is coming from the neck pocket?
A: A rattle emanating from the neck pocket often indicates loose components, such as a loose neck plate or other parts within the pocket. Excessive play in the neck joint can also cause this type of sound.
Q: What tools might be needed to adjust string height?
A: String height adjustments typically require a string winder, a string action gauge, and potentially a screwdriver set, depending on the specific type of adjustment required.
Q: What are some preventive measures to avoid future rattles?
A: Regular inspections, proper string tension, and maintaining appropriate humidity levels can prevent future rattles. Checking for loose components during regular maintenance is also crucial.