 Nimila
How long does it take to replace a furnace? This comprehensive guide delves into the intricacies of furnace replacements, exploring the factors that influence the timeframe, from the complexities of the system to the availability of materials, installation conditions, and even permitting procedures. We’ll examine the steps involved, whether you tackle the project yourself or hire professionals. Understanding these nuances is crucial for a smooth and efficient replacement process, allowing you to heat your home effectively and avoid costly delays.
Replacing a furnace can be a significant undertaking. From the initial planning stages to the final inspection, various elements influence the overall duration. Understanding these factors can help you prepare adequately and make informed decisions. This guide provides a detailed overview, enabling a better understanding of the time commitment involved.
Factors Affecting Furnace Replacement Time
Replacing a furnace, while often a necessary home improvement, can vary significantly in duration. Several factors play a crucial role in determining the timeframe, from the complexity of the existing system to the availability of parts and the installation conditions. Understanding these factors can help homeowners anticipate the overall project timeline and prepare accordingly.
Complexity of the System
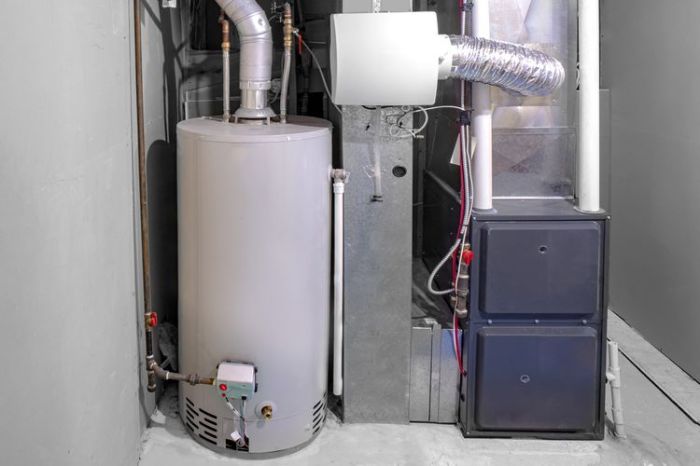
The intricacy of the existing plumbing and ductwork directly influences the replacement time. A furnace with a complex piping system, intricate ductwork, or unique venting requirements will inevitably take longer to replace than a standard, straightforward setup. This increased complexity often necessitates more time for careful disassembly, rerouting, and re-installation, adding significant time to the project. For example, an older home with a furnace that requires specialized tools or techniques for disassembling or connecting the new system will invariably lengthen the replacement process.
Availability of Materials
The availability of materials, including the furnace itself, components, and necessary tools, significantly impacts the timeline. Delays in delivery or shortages can extend the replacement process. If the chosen furnace model is not readily available, the project will inevitably take longer. This is especially true for specialized or custom-designed systems. For example, an unusually high demand for a specific furnace model during a particularly cold winter season can delay the delivery time.
Installation Conditions
Installation conditions, such as the layout of the home, access to the furnace room, and any potential building code restrictions, also impact the duration. A cramped or difficult-to-access installation area can increase the time required for the installation process. Similarly, building code regulations, especially concerning venting and safety, might necessitate additional steps, leading to increased project duration. Furthermore, adverse weather conditions, such as extreme temperatures or inclement weather, could also delay installation.
Table: Typical Furnace Replacement Timelines
| Furnace Type | Size (BTU) | Fuel Type | Brand | Typical Replacement Timeline (Days) |
|---|---|---|---|---|
| Standard Gas Furnace | 80,000 BTU | Natural Gas | ABC Furnace | 3-5 |
| High-Efficiency Gas Furnace | 95,000 BTU | Natural Gas | XYZ Furnace | 4-6 |
| Electric Furnace | 12,000 BTU | Electric | Generic Electric | 2-4 |
| Condensing Gas Furnace | 100,000 BTU | Natural Gas | DEF Furnace | 5-7 |
| Dual Fuel Furnace | 110,000 BTU | Natural Gas/Propane | GHI Furnace | 6-8 |
Note: These timelines are estimations and may vary based on the specific circumstances of the installation. Factors such as complexity, access, and local regulations will affect the actual duration.
Stages of Furnace Replacement: How Long Does It Take To Replace A Furnace

Replacing a furnace is a significant undertaking, requiring careful planning and execution. Proper sequencing of steps ensures a smooth transition and minimizes disruptions. Understanding the stages involved helps homeowners anticipate the process and manage expectations effectively.
Pre-Installation Steps
Before the installation crew arrives, several critical tasks must be completed. These pre-installation steps are crucial for a smooth and efficient replacement process. Failing to address these preliminaries can lead to delays and complications.
- Clearing the Work Area: Thorough clearing of the area surrounding the old furnace is paramount. This includes removing any obstructions, furniture, or debris that could impede the installation team’s access to the work site. For example, clearing a 10-foot radius around the old furnace will ensure unobstructed access for the installation team, preventing potential delays.
- Ensuring Adequate Ventilation: Adequate ventilation is crucial for both the safety of the installation team and the overall success of the replacement. Verify that the installation space has sufficient airflow to prevent any buildup of fumes or hazardous gases. This step ensures a healthy working environment and prevents any potential health risks for the technicians.
- Disconnecting Existing Utilities: This critical step involves shutting off the gas supply, disconnecting the power supply to the old furnace, and disconnecting any existing ductwork connections. Failure to properly disconnect these utilities can lead to gas leaks, electrical hazards, and damage to the existing ductwork.
- Preparing the Installation Site: Ensuring a level and stable foundation for the new furnace is essential for its proper functioning and longevity. Checking for any potential structural issues or irregularities in the floor or wall will prevent issues with stability and prevent costly repairs in the future.
Installation Process
The installation process involves a sequence of steps, from disconnection to connection of the new equipment. Careful attention to detail at each stage is crucial to avoid complications.
- Disconnection of Old Equipment: The installation crew meticulously disconnects the old furnace from all utilities, including gas lines, electrical connections, and ductwork. This ensures a safe and controlled environment for the removal of the old unit. Proper disconnection prevents damage to the old unit and ensures a safe working environment for the technicians.
- Removal of Old Equipment: After disconnecting all utilities, the old furnace is carefully removed from its location. This step requires expertise and the appropriate tools to ensure a smooth and efficient removal process, minimizing potential damage to the surrounding area. The removal process is crucial in order to effectively replace the old unit.
- Installation of New Equipment: The new furnace is positioned in its designated location and secured according to the manufacturer’s specifications. This step involves ensuring the new unit is properly aligned and leveled to prevent any future issues. The new unit is properly secured in its designated spot in order to ensure the longevity of the equipment.
- Connection of New Equipment: The installation team meticulously connects the new furnace to all utilities, including gas lines, electrical connections, and ductwork. This step involves proper connections to ensure a safe and efficient operation of the new furnace. Ensuring all connections are secure is essential for the new furnace to function properly.
- Testing and Commissioning: The final step involves testing the new furnace to verify its proper functioning. This includes checking for leaks, ensuring proper airflow, and confirming that the unit is operating at optimal efficiency. This step guarantees the furnace is working correctly and is ready for use. The new furnace is tested thoroughly before it is considered operational.
Factors Affecting Installation Time
Various factors can influence the time required for each stage of the replacement process. Tight spaces, limited access, or complex ductwork configurations can significantly impact the duration of the replacement.
| Stage | Task | Typical Time (Estimate) | Potential Delays |
|---|---|---|---|
| Disconnection | Disconnect utilities and remove old equipment | 1-2 hours | Complex piping, hard-to-reach locations |
| Removal | Remove old equipment | 1-3 hours | Tight spaces, structural issues |
| Installation | Install new equipment | 2-4 hours | Limited access, complex ductwork |
| Connection | Connect new equipment to utilities | 1-2 hours | Difficult ductwork connections, specific gas line requirements |
| Testing | Testing and commissioning | 1-2 hours | Equipment malfunctions, unusual gas requirements |
Professional vs. DIY Replacement
Choosing between a professional and DIY furnace replacement hinges on factors like expertise, time constraints, and potential risks. A professional installation, while often more expensive, guarantees a safe and efficient system, minimizing the chances of costly mistakes and ensuring compliance with local codes. DIY replacement, on the other hand, can save money but carries significant risks, from improper installation to safety hazards.
Time Comparison: Professional vs. DIY
The time required for furnace replacement varies drastically between professional and DIY approaches. A professional installation, while potentially longer in initial planning and scheduling, usually takes a shorter overall time to complete. This includes the time taken to handle permits, material delivery, and the actual installation itself. Conversely, a DIY project can take considerably longer due to the learning curve of complex installation steps and potential troubleshooting or delays.
Potential Pitfalls of DIY Replacement
Several challenges can arise when attempting a DIY furnace replacement. Improper installation can lead to inefficient operation, reduced lifespan of the system, and increased energy consumption. Lack of expertise can result in hazardous situations, like carbon monoxide leaks, electrical shocks, or structural damage. Furthermore, the complexity of modern furnace systems can easily overwhelm a novice installer, causing delays and potential errors.
A misaligned component or a poorly sealed ductwork can lead to significant inefficiencies and wasted energy.
Situations Favoring Professional Installation
Hiring a professional installer is often more efficient and faster in specific situations. These include cases involving complex systems with intricate piping, wiring, or venting requirements. If the project involves a new home build or major renovations, a professional’s expertise in coordinating with other tradespeople can streamline the process. Further, if there are local building codes or specific requirements for furnace installation, a professional can ensure compliance and avoid potential penalties.
Steps Involved: Professional vs. DIY
The steps involved in a professional installation differ significantly from a DIY attempt. Professionals usually handle permitting, scheduling, and coordinating material deliveries. They possess the specialized tools and knowledge for accurate measurements, safe handling of components, and precise installation. A DIY installation, conversely, necessitates more extensive research, preparation, and potentially acquiring specific tools and safety gear.
Comparison Table: Professional vs. DIY
| Feature | Professional Installation | DIY Installation |
|---|---|---|
| Estimated Time | 3-5 days (including prep and permitting) | 5-10 days (potentially longer with errors and delays) |
| Cost | Higher (includes labor and permits) | Lower (excluding labor and potential errors) |
| Risks | Lower (professionals are insured and experienced) | Higher (involves safety hazards and potential errors) |
| Efficiency | Higher (due to expertise and coordination) | Lower (due to learning curve and potential mistakes) |
| Compliance | High (ensures adherence to building codes) | Low (risk of non-compliance) |
Permitting and Inspection Procedures
Replacing a furnace, while crucial for home comfort and safety, often involves navigating local permitting and inspection procedures. These steps, though sometimes time-consuming, are vital to ensure compliance with building codes and ensure the safety of the installation. Understanding these procedures can help homeowners anticipate potential delays and plan their replacement project effectively.Local regulations regarding furnace replacements vary significantly.
Some jurisdictions have strict requirements for permitting and inspections, while others may have less stringent guidelines. The complexity of the building codes in your area directly impacts the overall replacement timeline. These factors will influence the duration of the permitting and inspection process.
Permitting Process Overview, How long does it take to replace a furnace
The permitting process for a furnace replacement typically involves submitting an application to the local building department. This application often requires detailed information about the new furnace, including its specifications, fuel type, and any modifications to the existing system. Homeowners must provide blueprints, diagrams, or other documentation to ensure the project complies with local regulations.
Inspection Scenarios
Different scenarios can impact the permitting and inspection timeline. For instance, a straightforward replacement of a furnace in a standard home will generally have a shorter permitting and inspection process compared to a more complex renovation project involving multiple systems. Building codes vary by jurisdiction, so certain regions may have more stringent regulations than others. A homeowner in an area with complex building codes for gas lines or specialized venting systems will face a more protracted permitting process.
Permitting and Inspection Timeline
The duration of the permitting and inspection process is influenced by various factors, including local regulations, the complexity of the project, and the availability of inspectors. In many jurisdictions, obtaining permits for a straightforward furnace replacement can take anywhere from a few days to a couple of weeks. However, the process can be significantly longer for projects with intricate details or those requiring multiple inspections.
| Step | Description | Typical Time (estimated) |
|---|---|---|
| Application Submission | Submitting the application with necessary documents to the local building department. | 1-3 business days |
| Permit Issuance | Review and approval of the application by the building department, resulting in the permit issuance. | 2-5 business days |
| Initial Inspection | Initial inspection by the building inspector to verify compliance with the building codes. | 1-2 business days |
| Follow-up Inspection(s) | Additional inspections might be required if modifications or complex installations are involved. | 1-5 business days per inspection |
| Final Inspection | Final inspection to confirm that the installation meets all codes and standards. | 1-2 business days |
Note: The estimated timeframes are approximate and can vary considerably based on local regulations and the complexity of the project.
Impact of Local Regulations
Local regulations play a crucial role in shaping the permitting and inspection process. For example, areas with stringent codes for gas lines may require more detailed inspections and longer permitting timelines. Homeowners in such jurisdictions should anticipate a more extensive process to ensure their project complies with all requirements.
Typical Timeframes for Different Furnace Types
Replacing your furnace is a significant undertaking, requiring careful planning and execution. Understanding the typical timeframe for different furnace types is crucial for homeowners to effectively manage their project timeline and budget. This section delves into the variations in installation times for various furnace models and identifies factors that influence these differences.Choosing the right furnace for your home hinges on factors like energy efficiency, cost, and compatibility with your existing HVAC system.
Gas furnaces, for instance, are often popular for their high efficiency and relatively lower initial costs, while electric furnaces offer a quieter operation. However, each type has unique installation procedures that impact the overall replacement time.
Average Replacement Times by Furnace Type
The time it takes to replace a furnace varies significantly depending on the type of furnace and the complexity of the installation. Factors such as the size of the home, the availability of materials, and the complexity of the existing ductwork all contribute to the overall timeframe.
| Furnace Type | Average Replacement Time | Contributing Factors |
|---|---|---|
| Gas Furnaces | 2-5 days | Installation complexity varies based on the furnace’s size and the home’s existing ductwork. Older homes may require more extensive ductwork modifications, potentially extending the replacement time. |
| Electric Furnaces | 1-3 days | Generally faster to install than gas furnaces, due to less complex venting requirements. However, the size and complexity of the electrical connections can impact the overall time. |
| Oil Furnaces | 2-4 days | Replacing oil furnaces often involves handling fuel lines and venting systems. The age and condition of the existing oil system influence the replacement time. |
Factors Affecting Installation Time
Several factors contribute to the variation in furnace replacement times for different furnace models. The complexity of the installation plays a major role. For example, older homes with complex ductwork or unusual layouts often require more time and specialized expertise for the installation process. Moreover, the availability of materials and skilled labor can impact the project timeline.
Estimating the Total Replacement Time
Accurately estimating the time needed for a furnace replacement is crucial for planning and managing the project effectively. A precise timeline allows homeowners to budget appropriately, schedule other tasks, and anticipate potential disruptions to their daily routines. Knowing the estimated time helps in managing expectations and avoiding surprises.
Factors Affecting Time Estimation
Accurate estimation of a furnace replacement project’s duration requires careful consideration of several key factors. These variables influence the overall timeline, impacting everything from initial preparation to final inspection. Understanding these elements helps homeowners prepare for the entire process.
- Complexity of the Installation: The complexity of the installation directly impacts the time needed. A straightforward replacement of a standard furnace in a typical home will take significantly less time than replacing a furnace in a multi-story home with unique ductwork or specific venting requirements. Factors such as the size and type of the new furnace, the complexity of the existing ductwork, and the location of the furnace room all contribute to the installation’s complexity.
- Availability of Materials and Skilled Labor: Delays in material delivery or unforeseen shortages of skilled technicians can significantly affect the project timeline. Supply chain issues or unexpected worker absences can cause unforeseen delays. Having a backup plan for material sourcing and skilled labor is vital.
- Permitting and Inspection Procedures: The time required for obtaining permits and completing inspections can vary based on local regulations and the specific requirements of the municipality. This is a crucial part of the process that must be factored into the overall timeline.
- Weather Conditions: Unfavorable weather conditions, such as extreme heat or cold, can impact the work progress. Outdoor work is often affected by weather. Consider the impact of the weather on the project duration.
- Homeowner’s Participation: The level of homeowner participation, such as the availability to prepare the area, can influence the project timeline. The homeowner’s cooperation and readiness for the installation greatly impact the speed of the project.
Step-by-Step Method for Estimating Time
A structured approach to estimating the total replacement time ensures accuracy and clarity. Following these steps helps homeowners understand the project’s various phases and anticipate potential delays.
- Initial Assessment: Thoroughly assess the existing furnace and the home’s layout. This includes considering the size of the furnace room, the type of furnace to be replaced, and the complexity of the ductwork. Detailed measurements and assessments are important to determine the project’s scope and potential challenges.
- Gathering Quotes: Obtain multiple quotes from qualified HVAC contractors, including labor costs, material costs, and any necessary permits or inspections. Comparing quotes from various contractors helps in choosing the best option and understanding the expected costs and timelines.
- Estimating Labor Time: Based on the quotes and the complexity of the installation, estimate the total labor hours required for each stage, including dismantling the old furnace, installing the new one, connecting ductwork, and performing final checks. Estimating labor hours for each stage allows a more accurate prediction of the project’s duration.
- Accounting for Delays: Anticipate potential delays due to weather, material shortages, or permit issues. Adjust the estimated timeline to account for these potential roadblocks. Building in extra time for unforeseen circumstances is crucial.
- Scheduling: Once the estimate is finalized, create a detailed schedule, including dates for obtaining permits, delivering materials, and conducting the installation. Scheduling the various stages helps in managing the project effectively.
Time Allocation Table
| Factor Considered | Estimated Time Allocation (Days) |
|---|---|
| Initial Assessment & Quotes | 2-3 days |
| Permitting & Inspections | 3-5 days |
| Material Delivery | 1-2 days |
| Furnace Replacement | 1-2 days |
| Ductwork & Final Checks | 1-2 days |
| Total Estimated Time (excluding delays) | 10-15 days |
Note: This table is a general guideline. Actual timeframes may vary depending on specific circumstances.
Illustrative Scenarios for Furnace Replacement
Replacing a furnace is a significant home improvement project. Understanding the potential timelines and challenges in different scenarios can help homeowners plan effectively. Factors like home size, complexity of the installation, and unforeseen circumstances can all impact the overall duration.Homeowners need to be prepared for the possibility of delays and extra costs, and having a realistic expectation of the time required will help them manage their projects efficiently.
Straightforward Furnace Replacement in a Typical House
A typical furnace replacement in a standard-sized house, with no significant structural or plumbing issues, generally takes 1-2 days. This timeline assumes a straightforward installation with readily available parts. The process usually involves the following steps:
- Disassembly and Removal of the Old Furnace: This involves disconnecting the old furnace from gas lines, electricity, and venting systems. The process is relatively straightforward for standard models, and usually takes a few hours.
- Installation of the New Furnace: Connecting the new furnace to the gas lines, electricity, and venting systems, followed by the necessary testing. This typically takes 3-4 hours, depending on the complexity of the connection.
- Final Checks and Testing: A thorough check for leaks, proper functioning, and safety compliance is performed. This involves testing the furnace’s heating capacity and overall performance. This part usually takes about an hour.
Complex Installation with Multiple Challenges
Sometimes, furnace replacements are complicated by pre-existing issues in the home’s structure, or the furnace’s model itself. A house with an unusual layout, or issues with the venting system, might extend the installation time significantly.
- Structural Modifications: If the new furnace needs adjustments to the existing ductwork or the house’s structure, it will increase the overall time needed. For instance, creating new pathways for ventilation or rerouting pipes may take 1-2 additional days.
- Difficult Access: Limited access to the furnace area or tight spaces in the basement or crawl space could slow down the work, requiring more time and possibly specialized tools. This could add 1-2 days to the project.
- Complex Venting Systems: If the venting system needs significant modifications or repairs, this will add time. For instance, fixing a damaged vent pipe could take an extra day.
Impact of Weather Conditions on Replacement Time
Unforeseen weather conditions can significantly affect the timeframe for a furnace replacement. Bad weather can cause delays in scheduling, and in certain situations, it could even halt the entire project.
- Extreme Temperatures: Extreme temperatures can make working outside difficult and even unsafe. Working in freezing temperatures can slow down the installation process.
- Heavy Rainfall or Snow: Heavy rainfall or snow can also affect the installation schedule. This could cause delays in the scheduling and/or require the use of specialized equipment, adding extra time.
- Poor Visibility: Low visibility, caused by fog or heavy rain, can also affect the timeline. Safety is a priority, and working conditions must be appropriate.
Multiple Factors Influencing the Replacement Timeline
Sometimes, a furnace replacement project is subject to multiple factors that can impact the timeline. This could be due to a tight schedule, unexpected issues, or even supply chain constraints.
- Tight Project Schedule: If the homeowner has a very tight deadline for the project, this could impact the availability of contractors and potentially increase the cost. It might require working overtime to meet the deadline, which can be more expensive.
- Unexpected Issues: Unexpected issues, such as a damaged pipe or an unexpected complication during the installation, can cause delays in the timeline.
- Supply Chain Constraints: If the needed parts for the new furnace are unavailable, it can lead to a delay in the project.
Final Summary
In conclusion, replacing a furnace is a multifaceted process influenced by numerous factors. Careful consideration of system complexity, material availability, installation conditions, professional vs. DIY approaches, permitting, and the type of furnace itself is crucial for accurate time estimations. This guide has provided a framework for understanding the key elements that affect the replacement timeline. By thoroughly evaluating these factors, homeowners can plan and execute the replacement process efficiently and effectively, ensuring a warm and comfortable home.
FAQs
How long does it take to get permits for a furnace replacement?
Permitting times vary significantly based on local regulations and the complexity of the project. It’s best to contact your local building department for specific timelines.
What if there are unexpected issues during the installation process?
Unexpected issues can arise, impacting the overall timeline. A professional installer will handle these situations, providing solutions and adjusting the schedule accordingly. If doing it yourself, be prepared for potential delays and have a contingency plan.
Can I expedite the furnace replacement process?
In some cases, expediting the process might be possible, but it often comes with a higher cost. Prioritizing the availability of materials and hiring a professional installer can sometimes reduce the total time, but this should be considered carefully.
What is the average time for a DIY furnace replacement?
DIY furnace replacements can range from a few days to a couple of weeks, depending on the complexity of the system and the individual’s skill level. Extensive experience with HVAC systems and the proper tools are essential for a successful DIY replacement.


